What is a Custom Function in AIF?
Custom functions allow users to call an SAP transaction, SAP report program, or a URL directly from a log message in the AIF message monitor. AIF custom functions make the life of an interface monitoring user a little bit easier. They let the users open SAP documents or execute a report by just clicking an icon in the AIF monitor without opening a new SAP GUI session and having to enter the transactions.
Custom functions can be configured to pass values from the log messages to SAP transactions as parameters. Message log functions can belong to iDocs, Proxy, or other types of integration protocols in SAP.
For example, let’s look at the log message ID 242 of standard SAP message class VL. The format of the log message is Delivery &1 Changed. &1 is the Delivery number that was created.
We can define a custom function to display the delivery document that was created by calling the standard delivery note display transaction vl02n. The custom function will allow us to call the vl02 transaction directly from the AIF message log.
Custom functions can be defined either using the standard AIF message monitor /AIF/ERR or from /AIF/CUST_FUNC transaction.
How to Create Custom Functions via /AIF/ERR
Let’s define a custom function to call the delivery note display transaction vl02n and then display the delivery note created by the iDoc.
The custom function will be built on top of the standard message number 242 of message class VL. The message has a format of Delivery &1 changed, &1 being the delivery number.
Step 1 – Select the Log Message
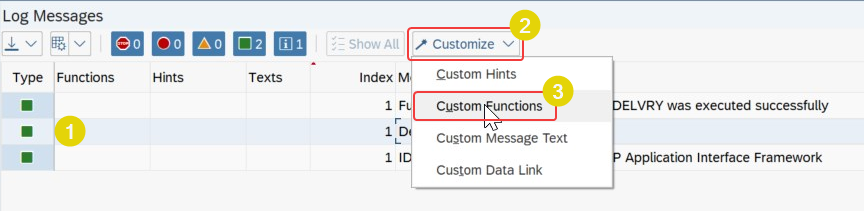
Go to transaction /AIF/ERR and select the log message you want to define the custom function for. In this example the message 242 of class VL.
Step 2 – Select Custom Function
From the menu select customize and from the drop-down menu select custom functions.
Step 3 – Configure Custom Function Action and Parameters
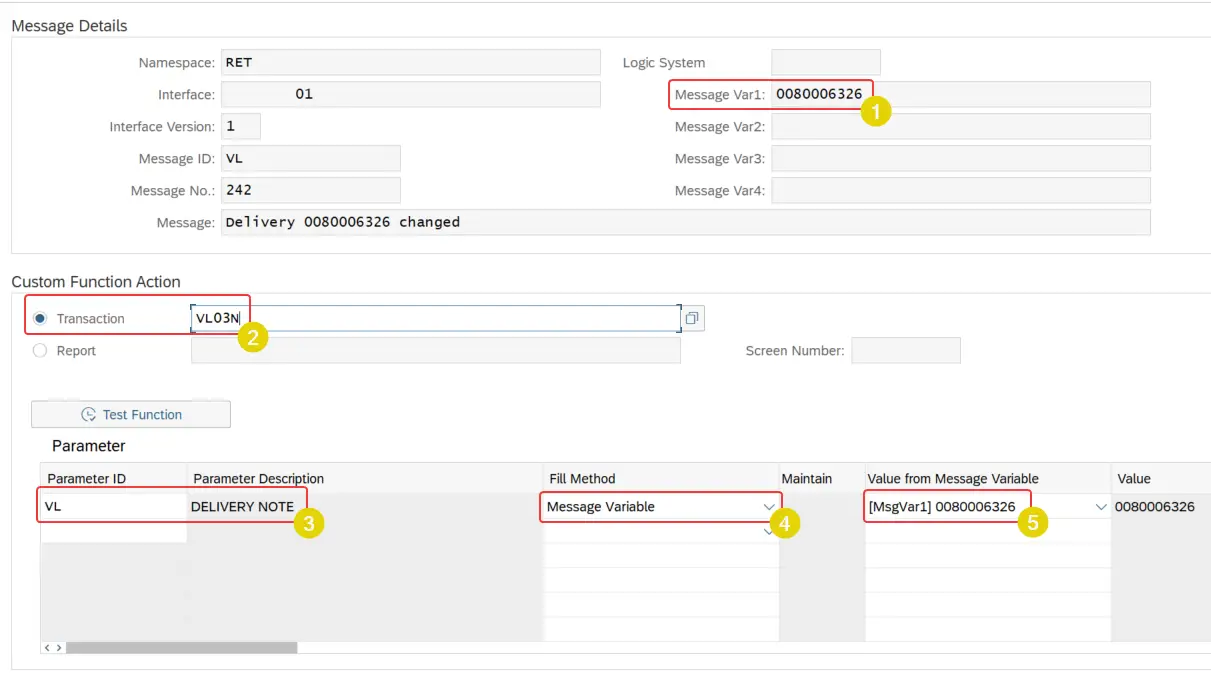
Configure the transaction you want to execute. For this example, we are calling the transaction vl02n.
Next, we need to define which parameters to pass from the log message to the transaction vl02n. We will pass the delivery note number in message parameter VAR1.
Message variable VAR1 holds the delivery number. This should be passed to the delivery number field of transaction vl02n which is denoted by parameter ID VL. Since we are using a value from the message log itself, we will use the fill method “Message Variable”. However, there are other options like Manual value.
Step 4 – Define Custom Function Attributes
In this section, we can define the notations of the custom function such as tooltip, description, and icon.
Additionally, we can configure the function to skip the initial screen of the called transaction. Hence, it skips the first screen of vl02n and directly goes to the delivery document.
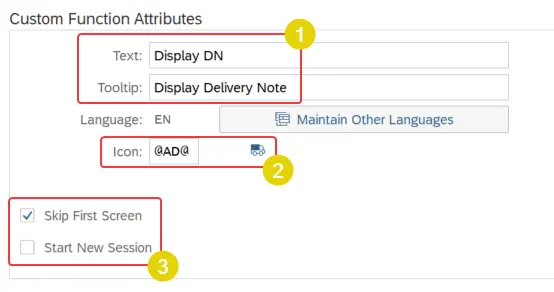
Moreover, we can configure the function to open the transaction vl02 in a new session.
Step 5 – Test Custom Function
Using the Test Function option in the configuration GUI, you can easily test if the function works as expected. However, in day-to-day operations, you can access the function via /AIF/ERR transaction.
The function should take you directly to the delivery note.
How to Configure Custom Functions Using AIF Customization
If you want to define global custom functions that all or a list of users can utilize, defining them via the AIF customizing transaction /AIF/CUST_FUNC is the most effective way.
Go to transaction /AIF/CUST_FUNC and follow the steps below to define global custom functions. Although the user interfaces are different, most of the customization parameters used in both methods are similar, other than /AIF/CUST_FUNC having some additional options.

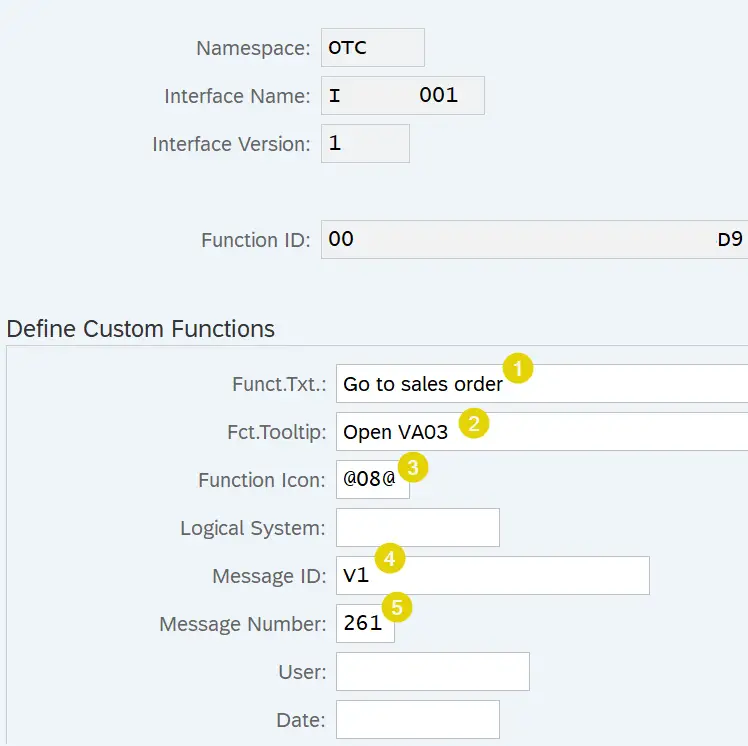
To illustrate the steps, let’s define a custom function to call sales order display transaction va03 from message ID 261 of message class V1.
Step 1 – Define Custom Function
Here we define the semantic information of the custom function.
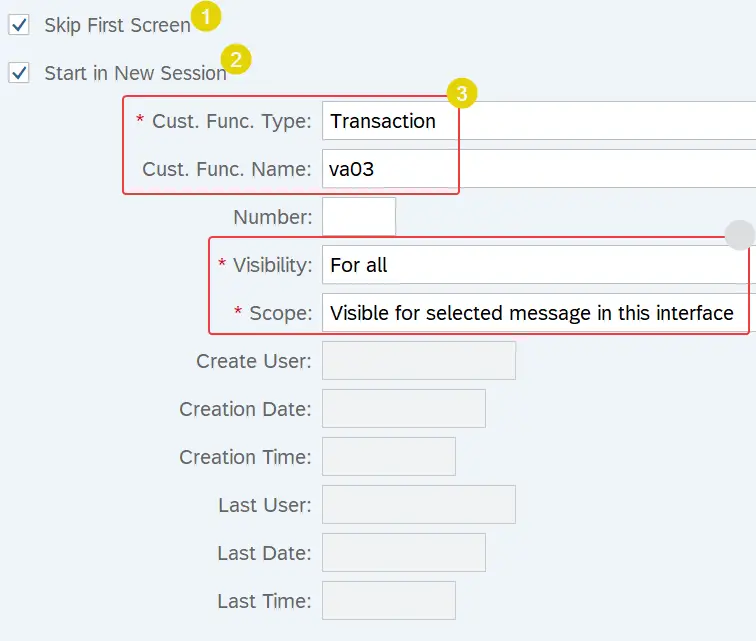
Step 2 – Configure Custom Function Attributes
In this section, the custom function type and transaction or the report name can be defined. Also, you can make the custom function visible to all users or a certain set of uses.
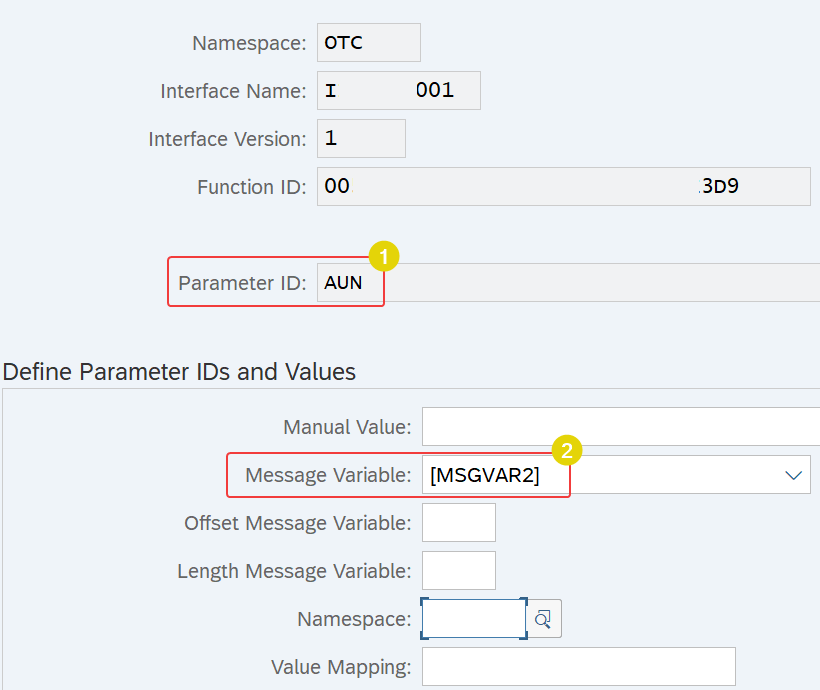
Step 3 – Configure Parameters and Values
Define a parameter to pass the sales order number from the log message 261 to va03 transaction.
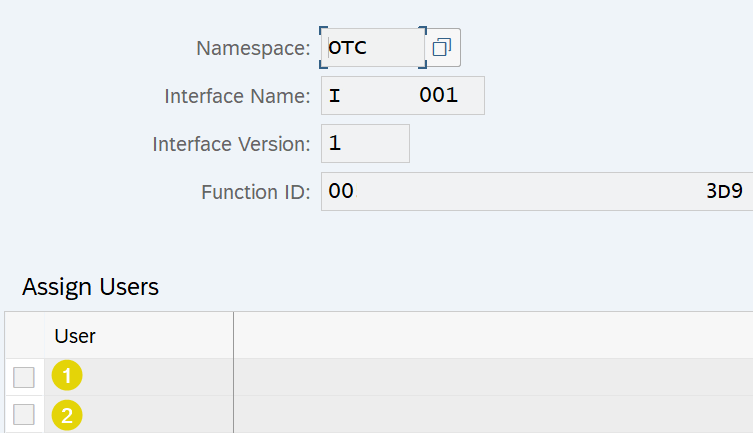
Step 4 – Assign Users
If you used the visibility option “Show to list of users” in step 2, now you can define the list of users.
The custom function will be visible to only the listed users in the /AIF/ERR. However, if you want the custom function to be visible to all users, simply select the visibility option “visible to all”. In this case, you do not have to maintain the users in this section.
Call a Report Program from a Custom Function
Now that we’ve seen how to define an AIF custom function that calls a transaction, let’s have a look at a function that calls a report program.
To illustrate this scenario, I have selected the standard sales order report SD_SALES_DOCUMENT_VIEW. With the help of this report users can select sales orders based on a set of selection parameters and display the sales orders with their information as a list.
We will configure an AIF custom function on top of message ID 261 of message class V1. The message format is Order &1 has been created (no delivery created). &1 is the sales order number.
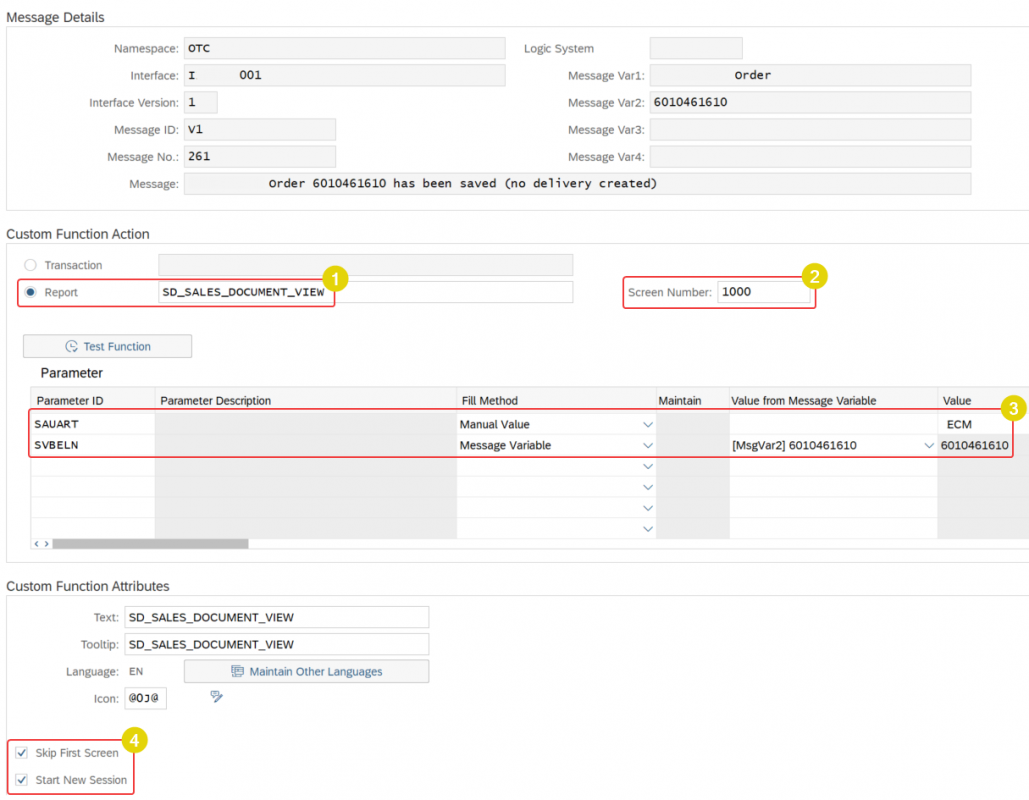
We will pass the sales order number from the message variable and the sales order type as a manual value from AIF to the report program SD_SALES_DOCUMENT_VIEW. Let’s configure the function to skip the initial screen and take the user to the sales order list directly.
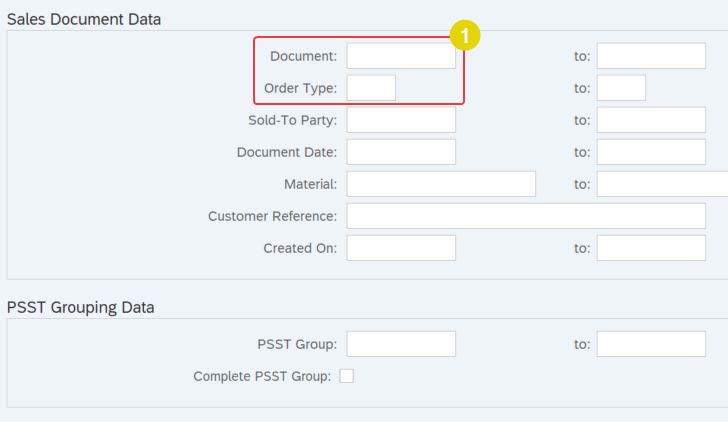
Report Program SD_SALES_DOCUMENT_VIEW
We will use the selection screen parameters document and order type to filter the sales order.
Configure Custom Function of Type Report
The main difference between defining a custom function of type transaction and a custom function of type report is the definition of screen number and the parameters.
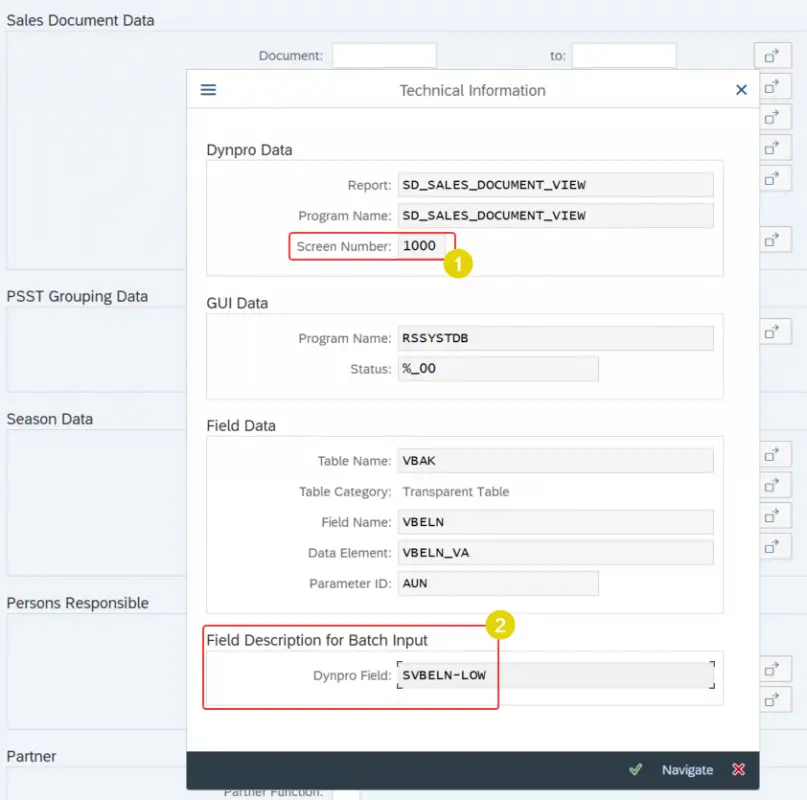
When it comes to calling a report, you need to define which screen number of the report is called. The screen number can be selected from the standard F4 help. Additionally, the selection parameters that should be used can be selected from the drop-down menu as well.
The technical names of the selection screen parameters and screen number can be viewed by going to the program information via transaction se38.
To summarize, AIF functions allow users to open SAP transactions, report programs, and URLs by simply clicking on an interface log message. AIF custom functions can be defined directly in /AIF/ERR transaction or via /AIF/CUST_FUNC customization tranaction. Moreover, a custom function can be defined globally such that all users can access it.
If you have any questions about AIF custom functions, please leave a comment below!

Hi,
Can we call custom transactions or custom reports in Custom Functions of AIF.
Thanks in Advance