Although we should always try to reuse iDoc Message Types and iDoc Types provided with standard SAP content, there could be scenarios where you need to create a completly new Message Type and iDoc type with your own custom processing logic. Let’s look at how to create and configure a completely new custom iDoc Type in SAP.
SAP Versions used in the illustration:
- SAP S4 HANA Fashion 1709
Scenario or Requirement for Custom iDoc Type:
Let’s assume you have an external Human Resource Management system and you want to transfer employee information to SAP from this external HR system using iDocs.
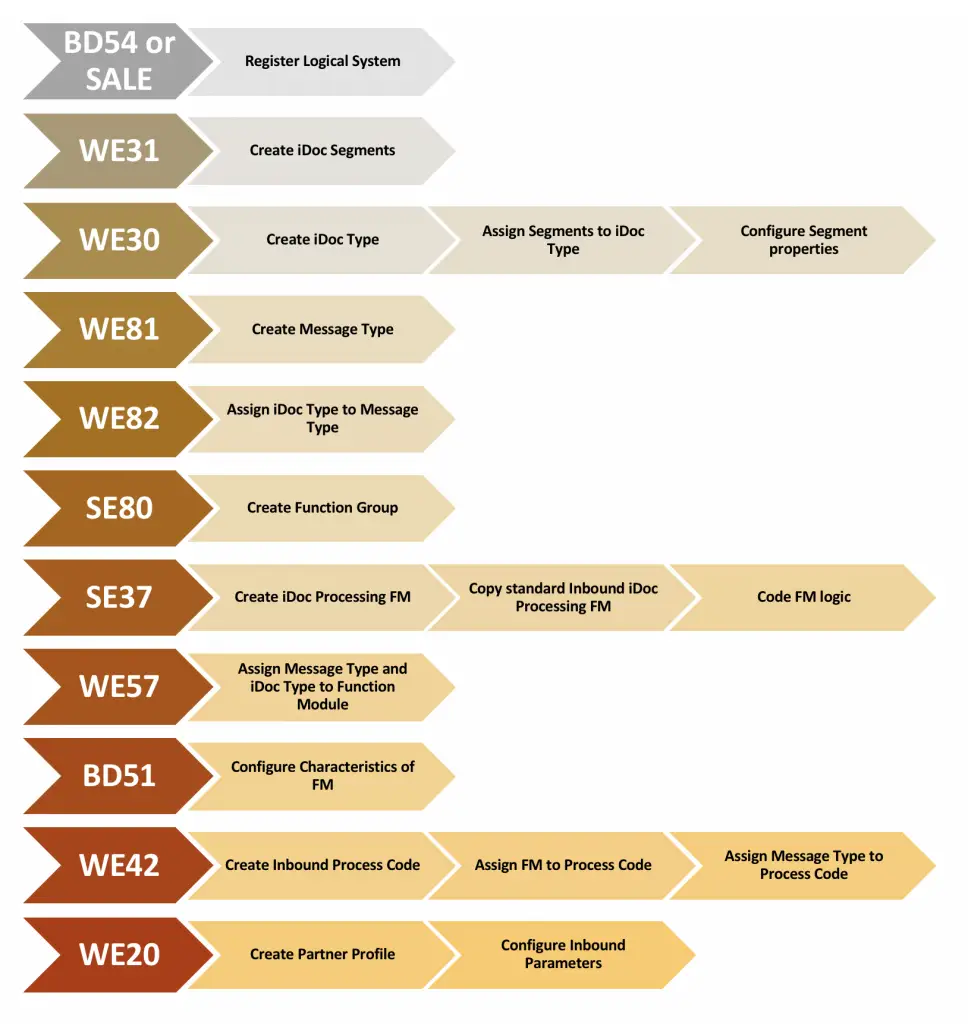
Overview of Steps to Create Custom iDoc Types.
- Register logical system – bd54 or sale
- Create custom iDoc segments – we31
- Define custom iDoc type – we30
- Create iDoc type
- Assign segments to iDoc Basic type
- Configure segment properties
- Create custom Message Type – we81
- Assign iDoc Basic type to Message Type – we82
- Create Function Group – se80
- Develop iDoc processing Function Module – se37
- Define iDoc processing Function Module
- Code iDoc data processing ABAP logic
- Assign FM to Message Type/Basic Type combination – we57
- Configure characteristics of processing FM – bd51
- Configure custom inbound Process Code – we42
- Create inbound Process Code
- Assign processing FM to Process Code
- Assign iDoc Message Type to inbound Process Code
- Setup Partner Profile – we20
- Create Partner Profile
- Configure inbound parameters of the Partner Profile
Let’s look at these steps in detail.
Step 1: Define iDoc Sender System as a Logical System in SAP.
First, let’s register the external HR system as a Logical System in SAP. Go to ALE transaction ‘SALE’ and select ‘DefineLogical System’ under ‘Logical Systems’.
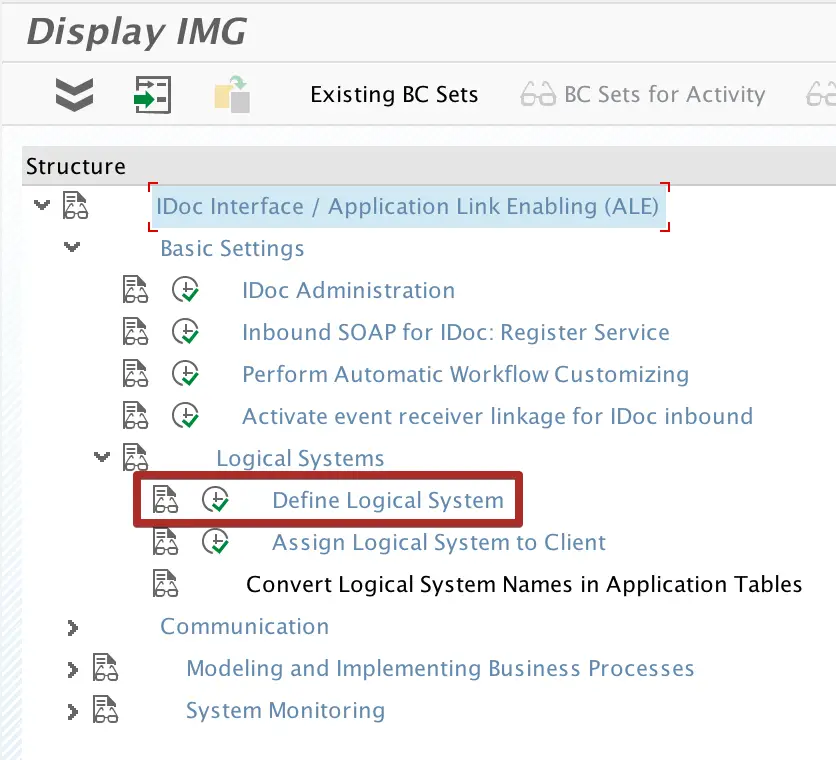
Let’s register the HR system as ‘TESTHR’.

You could also directly register the Logical System using transaction bd54.
Step 2: Create iDoc Custom iDoc Segments using Transaction We31.
Go to iDoc segment creation transaction we31 and create two new segments ‘ZEMP_HDR’ and ‘ZEMP_DESIGNATION’.
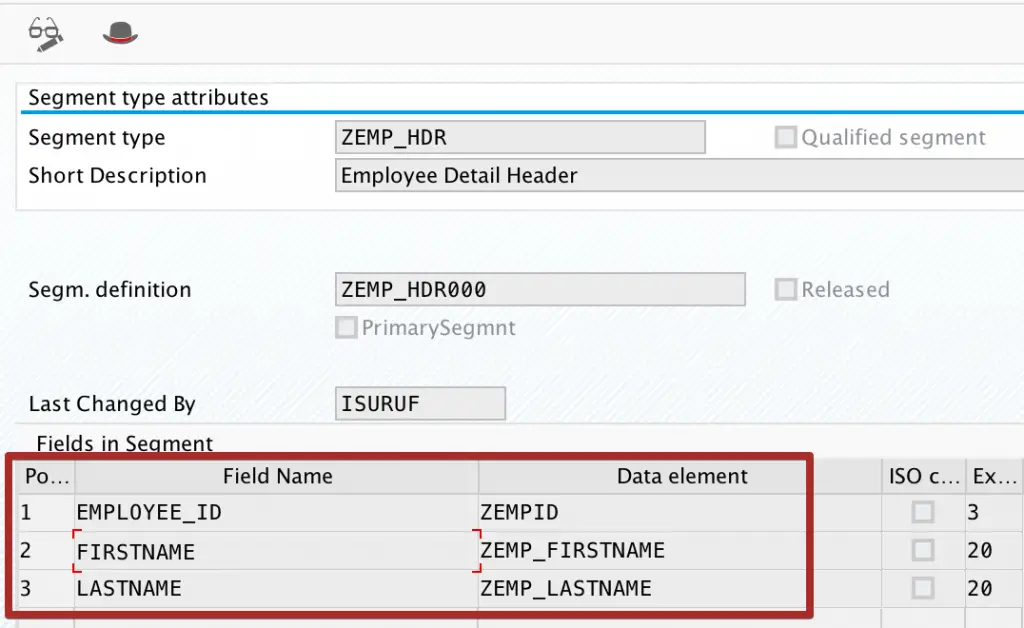
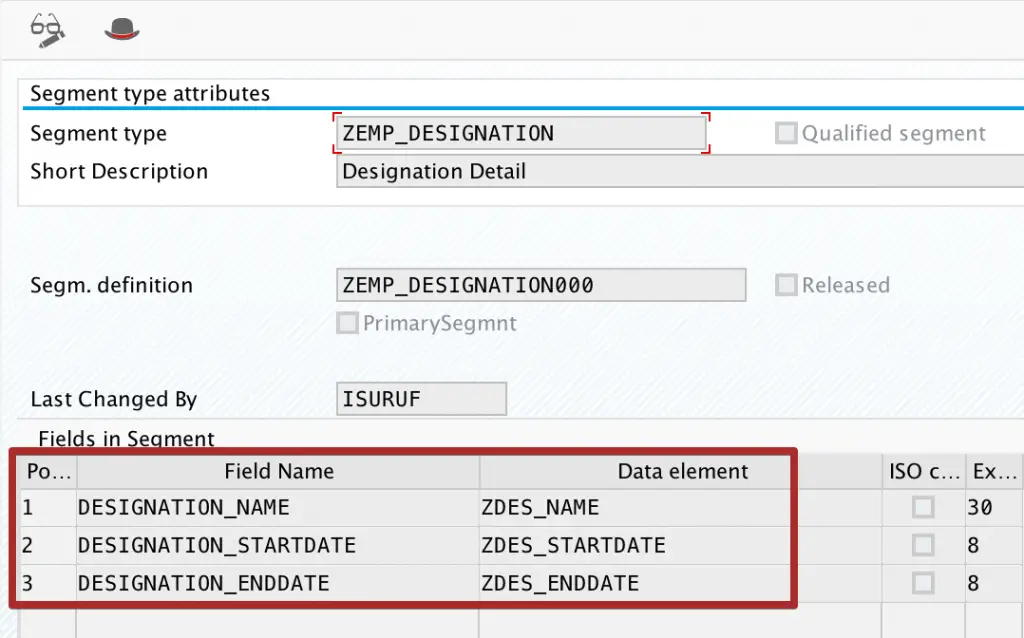
Using Segment Editor configure the fields of each segment. Set the field names and assign a data type for each field.
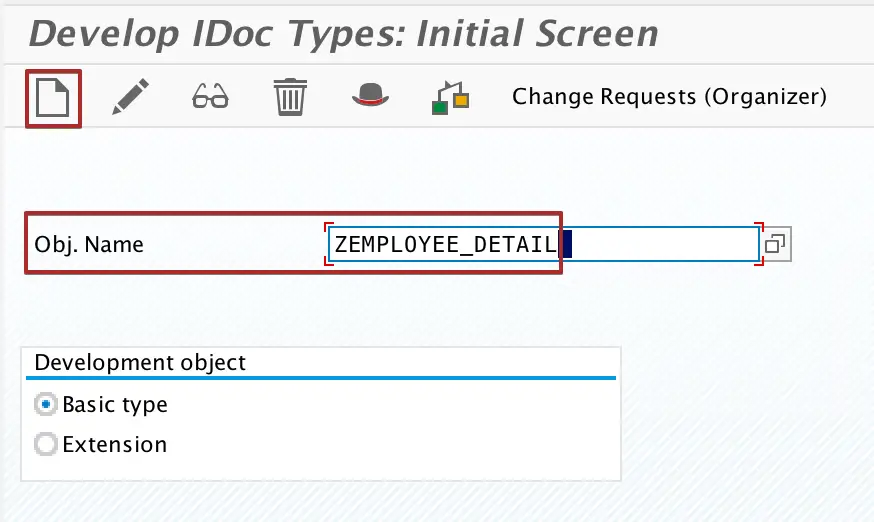
Step 3: Create Custom Z iDoc Basic type using Transaction we30.
Go to iDoc Basic Type creation transaction we30 and create custom iDoc type ‘ZEMPLOYEE_DETAIL’.
Select ‘Create New’.
Using Create button, add segments created in the previous step to iDoc Basic Type.

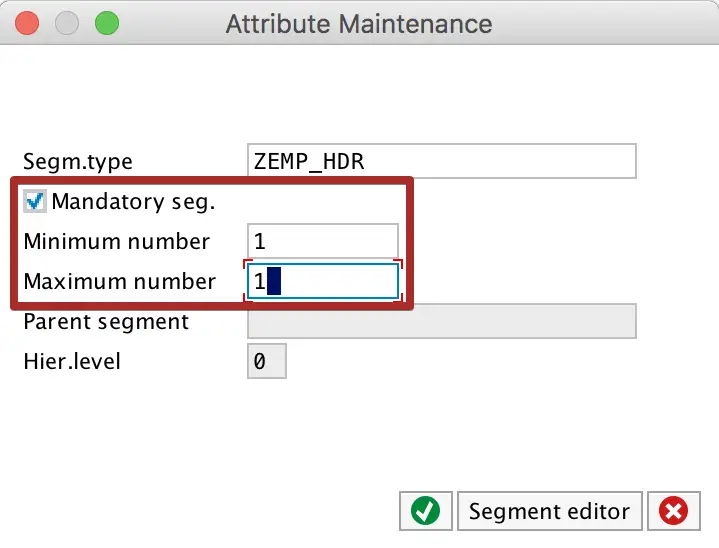
Set iDoc segment properties ‘Maximum Number’ and ‘Minimum Number’. These two settings correspond to maximum number of occurrences and minimum number of occurrences of the iDoc segment. If you want to configure a segment as mandatory, set the ‘Minimum Number’ as one.
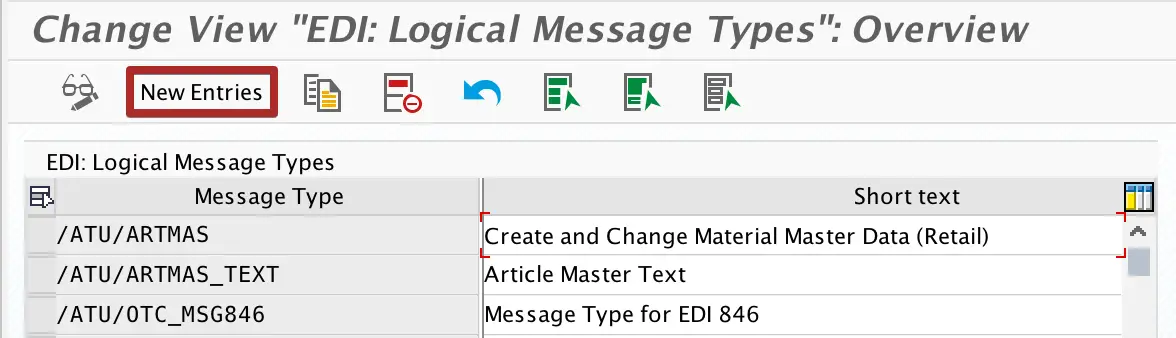
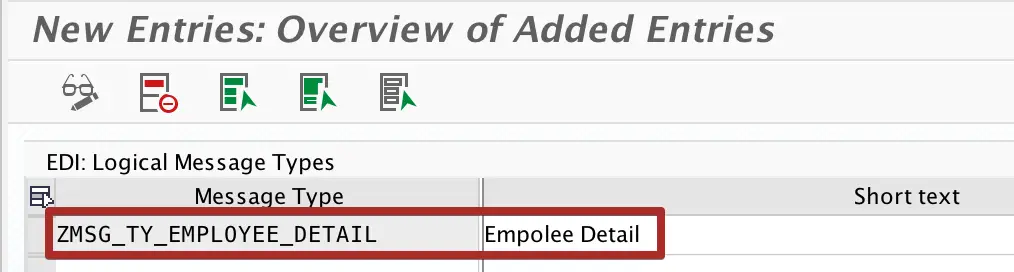
Step 4: Create Message Type using Transaction we81.
In change mode, add new entry and set the Message Type name as ‘ZMSG_TY_EMPLOYEE_DETAIL’.
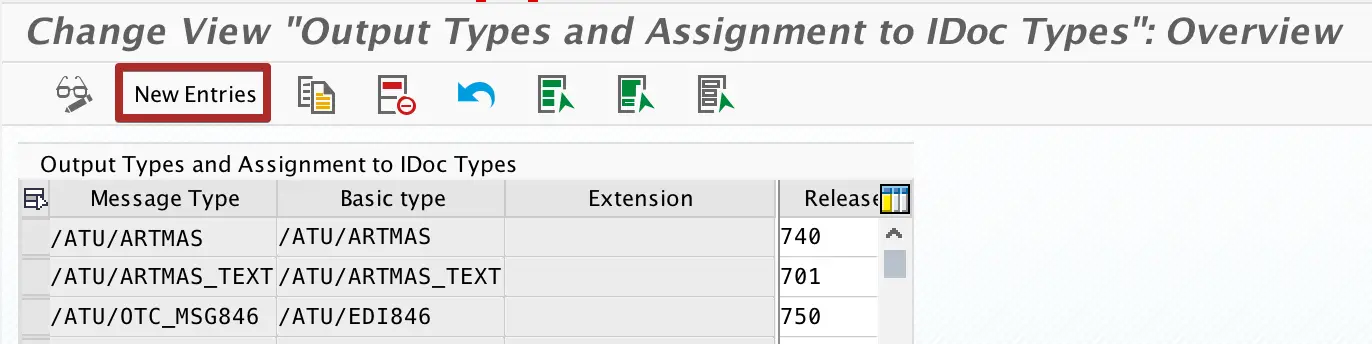
Step 5: Assign Message Type to iDoc Type Using Transaction we82.
Assign the Message Type ‘ZMSG_TY_EMPLOYEE_DETAIL’ created in step 4 with iDoc type ‘ZEMPLOYEE_DETAIL’ created in step 3. Notice, you also have to set the release version of your SAP system with the configuration.
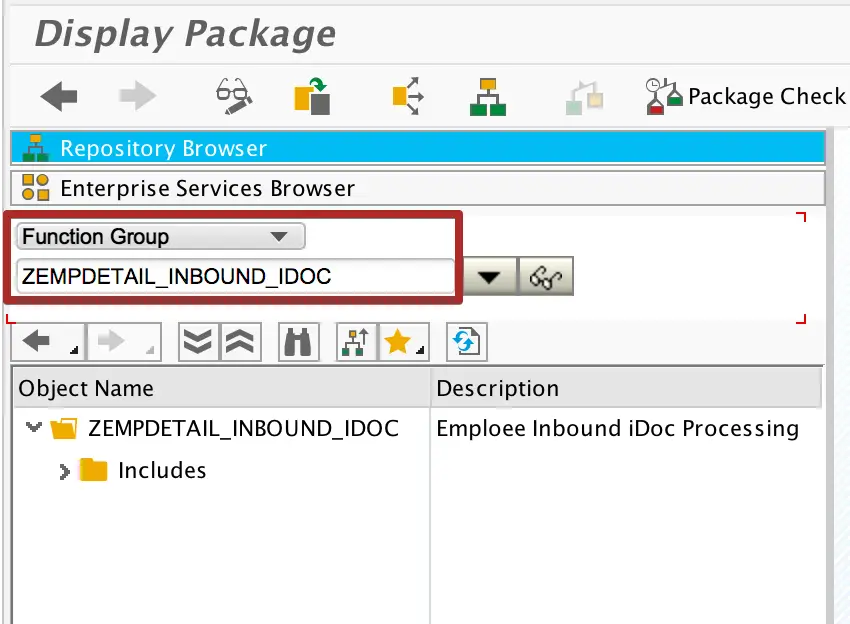
Step 6: Create Function Group in Transaction se80.
To assign the iDoc processing Function Module, create Function Group ‘ZEMPDETAIL_INBOUND_IDOC’ using transaction se80.
Step 7: Create Inbound iDoc Processing Function Module in se37.
We need a Function Module to process inbound iDocs in SAP. Inbound iDoc function modules should be in a certain format. That is, all inbound iDoc processing function modules have the same signature (import, export, tables and changing parameters). Only application/business logic of the function module is different in order to handle different Message Types and iDoc Types.
Signature of the inbound iDoc processing Function Module should be in below format.
  IMPORTING
     VALUE(INPUT_METHOD) LIKE  BDWFAP_PAR-INPUTMETHD
     VALUE(MASS_PROCESSING) LIKE  BDWFAP_PAR-MASS_PROC
  EXPORTING
     VALUE(WORKFLOW_RESULT) LIKE  BDWF_PARAM-RESULT
     VALUE(APPLICATION_VARIABLE) LIKE  BDWF_PARAM-APPL_VAR
     VALUE(IN_UPDATE_TASK) LIKE  BDWFAP_PAR-UPDATETASK
     VALUE(CALL_TRANSACTION_DONE) LIKE  BDWFAP_PAR-CALLTRANS
  TABLES
      IDOC_CONTRL STRUCTURE  EDIDC
      IDOC_DATA STRUCTURE  EDIDD
      IDOC_STATUS STRUCTURE  BDIDOCSTAT
      RETURN_VARIABLES STRUCTURE  BDWFRETVAR
      SERIALIZATION_INFO STRUCTURE  BDI_SER
  EXCEPTIONS
      WRONG_FUNCTION_CALLED
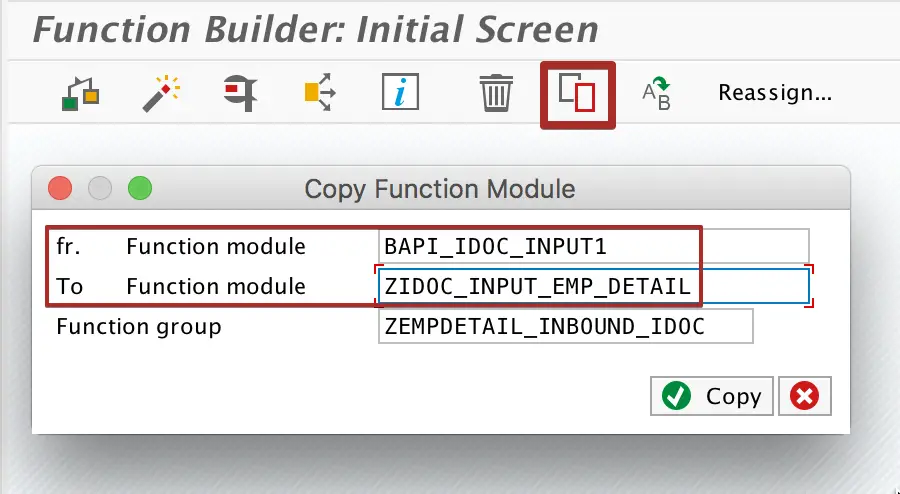
Find any standard inbound iDoc processing Function Module using transaction we57 and copy it to a custom Z function module in transaction se37. In this example I am using the standard Function Module ‘BAPI_iDoc_Input1’ to create my custom Z function module.
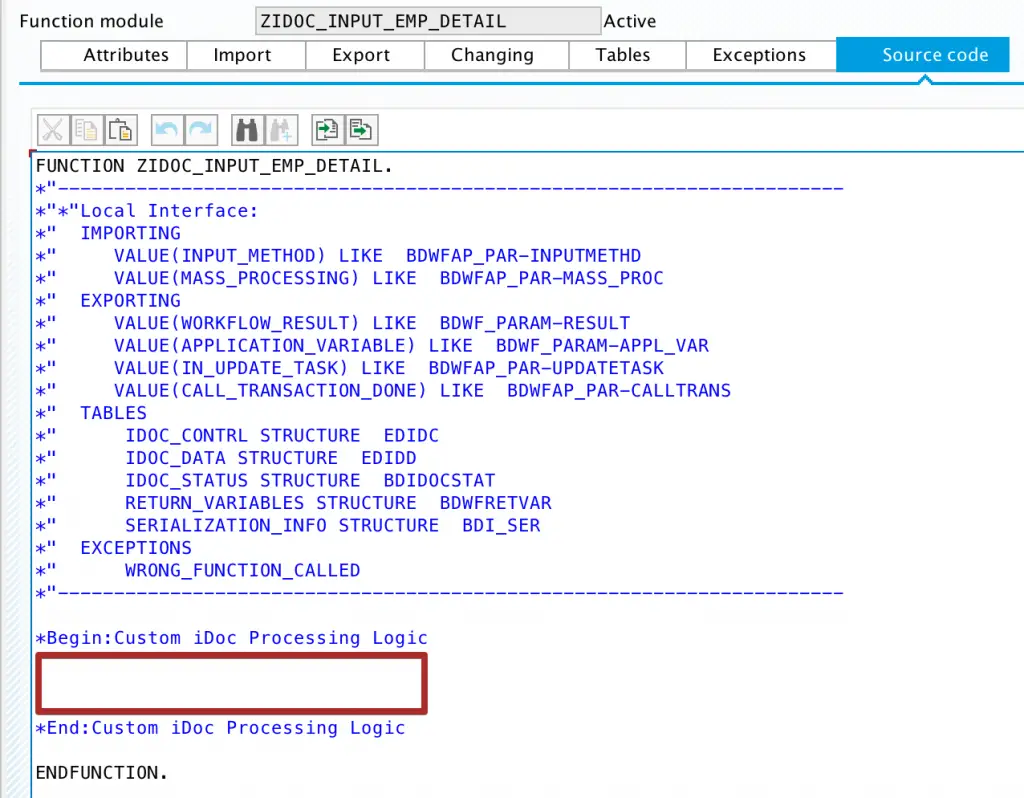
Write your own ABAP logic using IMPORT and TABLES parameters. Table IDOC_DATA contain iDoc segment data.
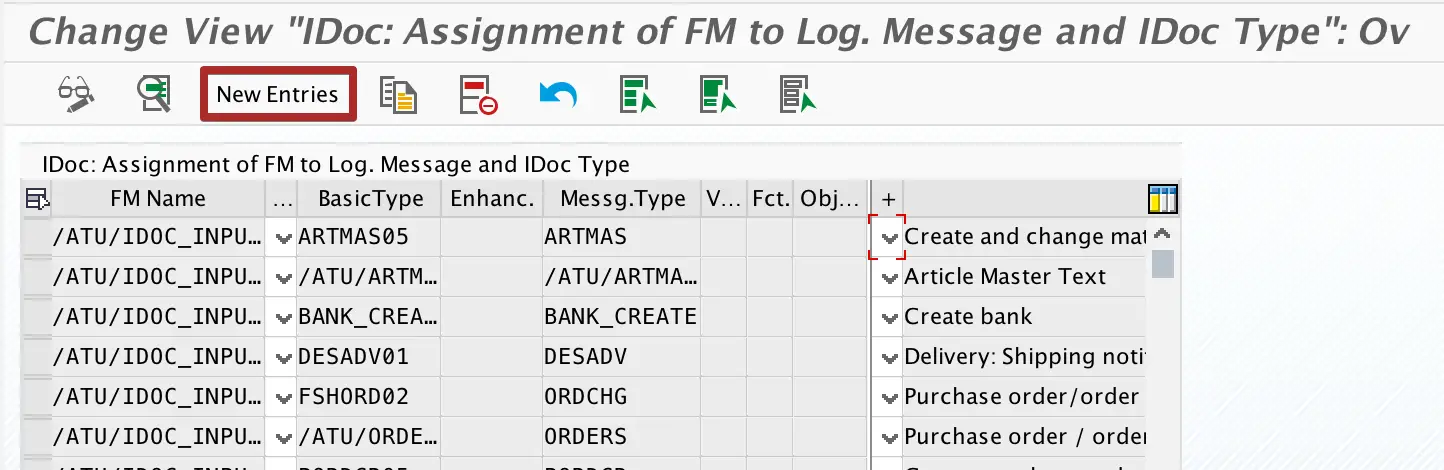
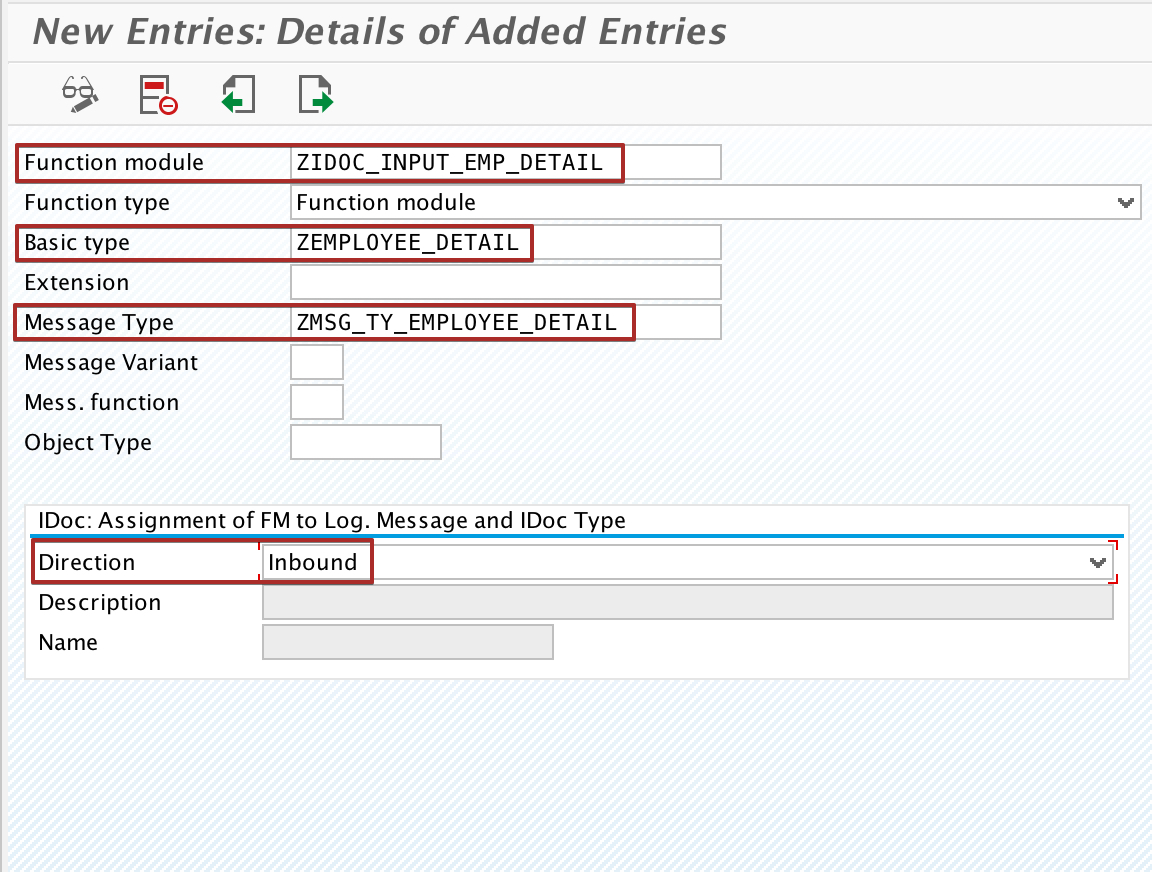
Step 8: Assign Message Type and iDoc Type to Function Module using Transaction we57.
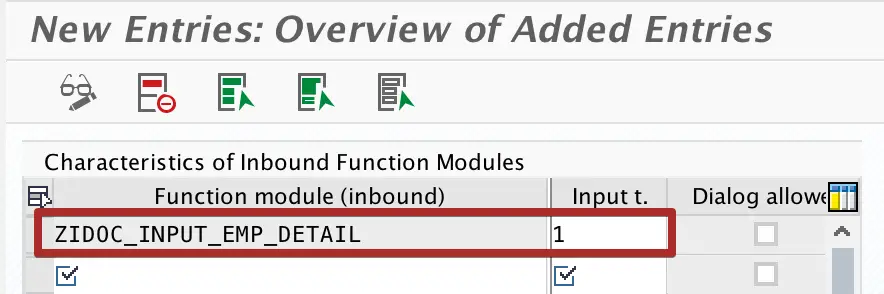
Step 9: Using Transaction bd51 Configure Characteristics of Inbound Function Module.
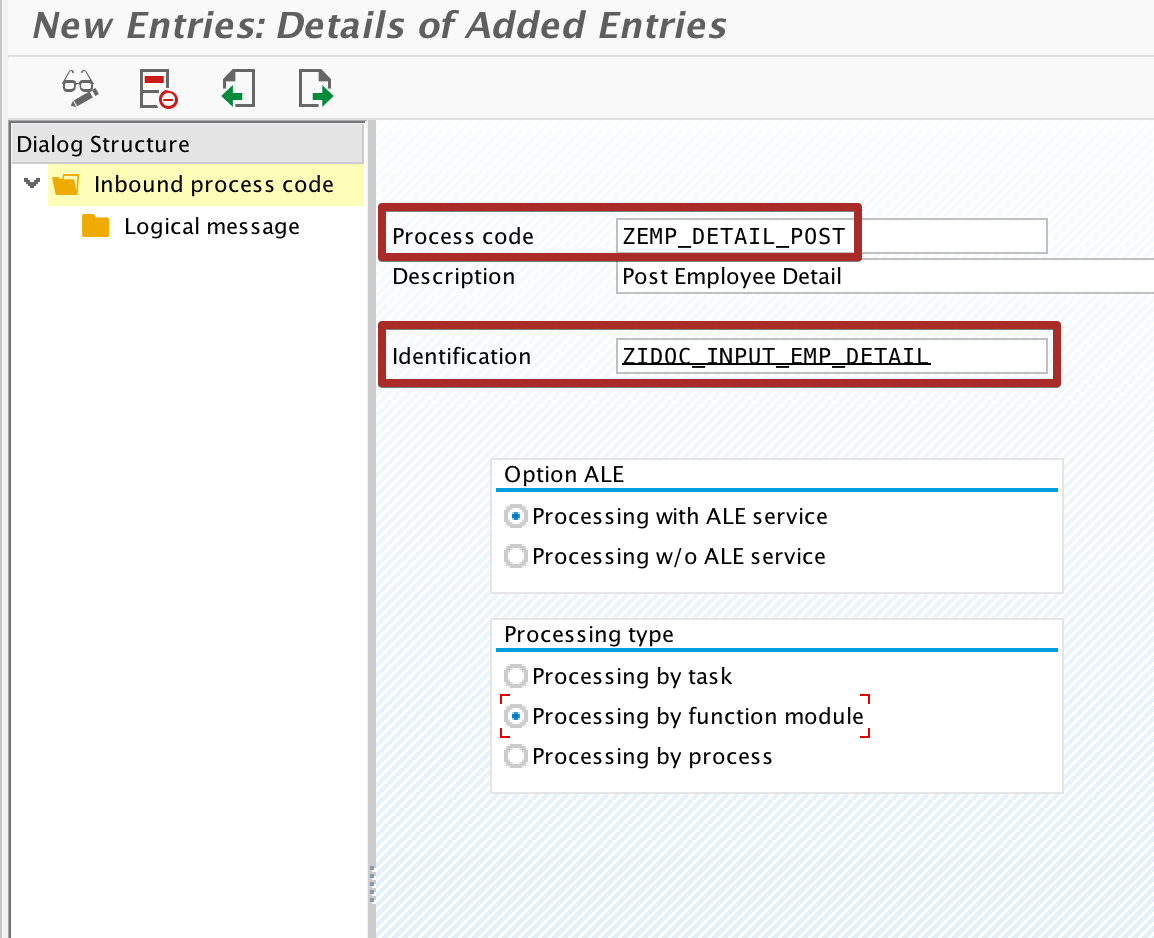
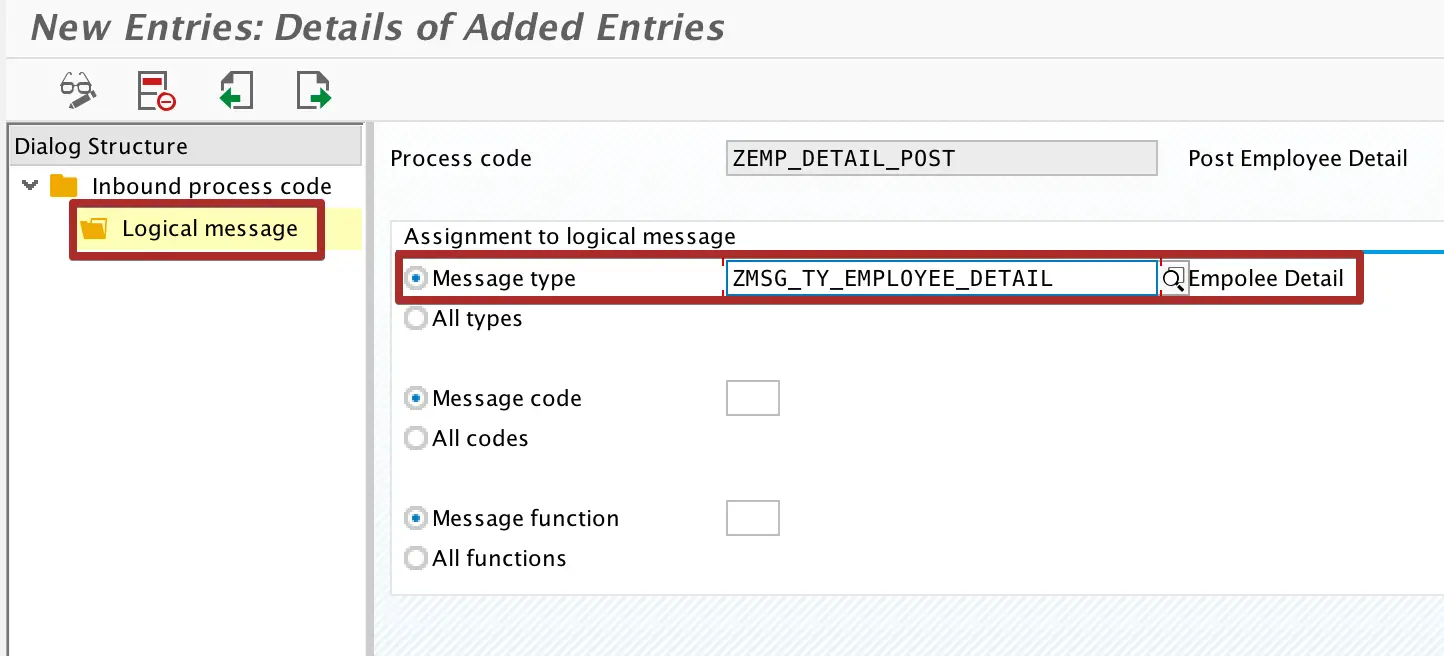
Step 10: Create Inbound Process Code in Transaction we42.
Create inbound process code ‘ZEMP_DETAIL_POST’ using custom iDoc Function Module created in step 7 and assign the Logical Message ‘ZMSG_TY_EMPLOYEE_DETAIL’ to Process Code.
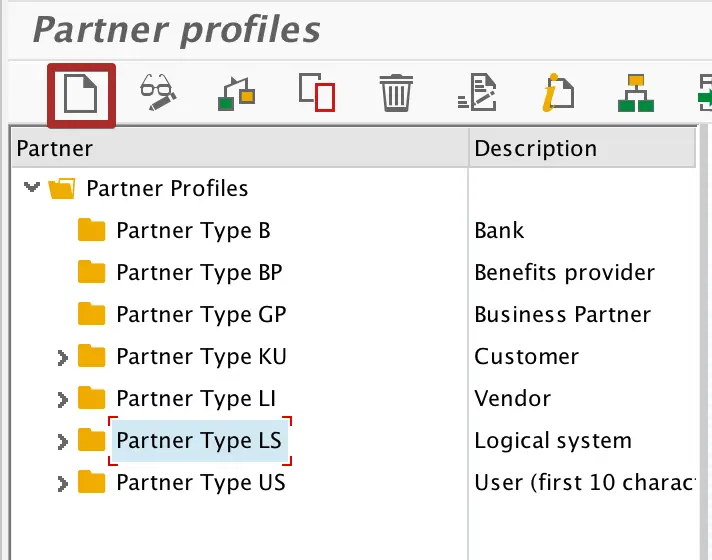
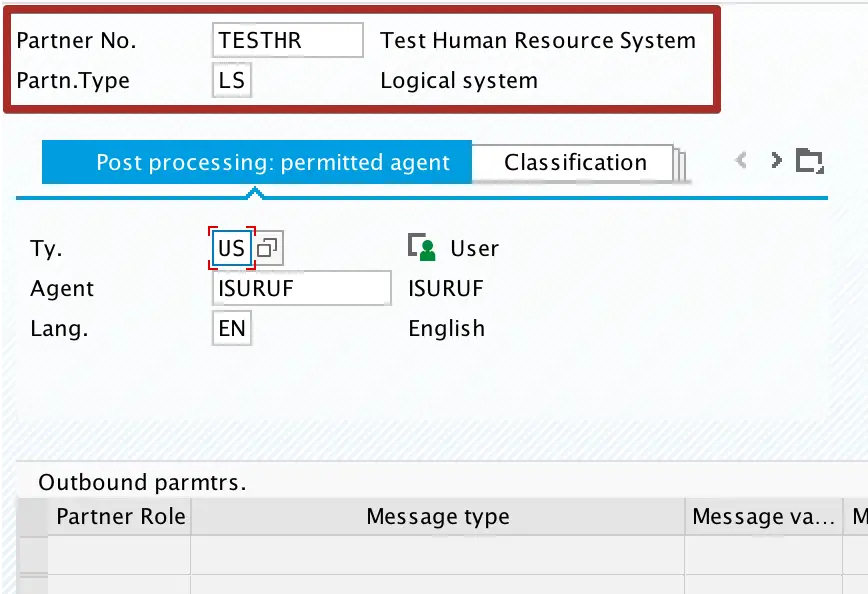
Step 11: In Transaction we20 Create Partner Profile.
Create Partner Profile in transaction we20 with the same name of the Logical System we had registered in Step 1.
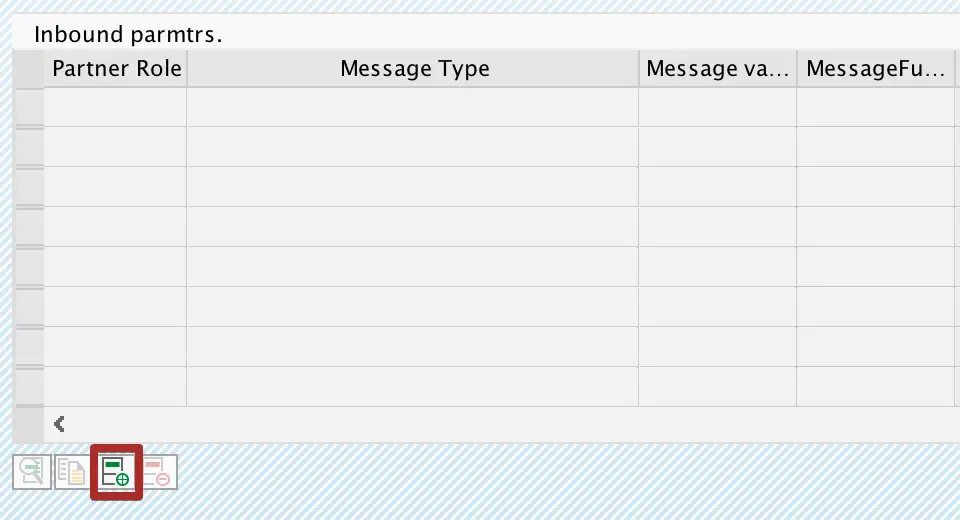
Step 13: Configure Inbound Parameters of Partner Profile using Transaction we20.
Configure Inbound Parameters with the Custom Message Type. Then assign the custom Z process code created in previous steps.

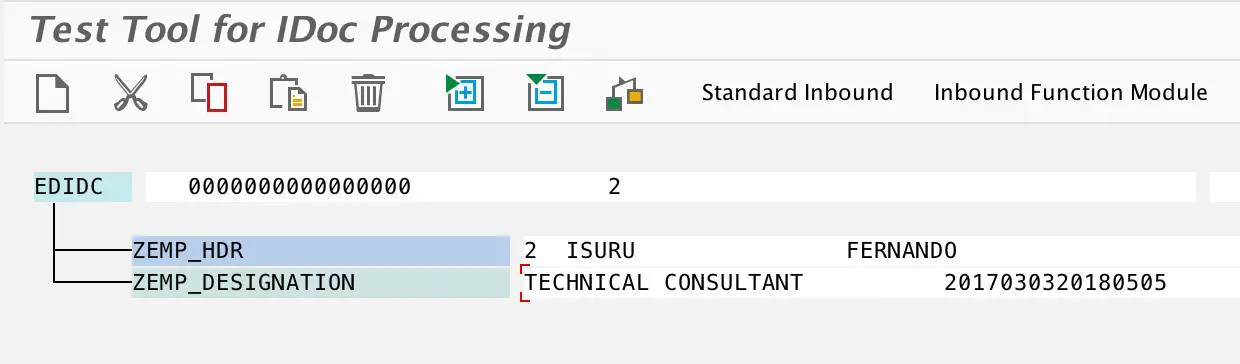
Step 12: Using iDoc Test Transaction we19 Create Test iDoc.
To test the newly created custom iDoc type, use transaction we19 and select test using ‘Basic Type’.
Fill data to the iDoc segment by double-clicking on each segment and executing the iDoc using ‘Inbound Function Module’ option.
You can check the status of the iDoc created in we02 or we05.
Please leave a comment if you have any questions about Custom iDoc Creation steps.

Congratulations on the article.
Is it possible to write an article about idoc between two SAP systems?
Many thanks and congratulations.
Very useful, Danke & could u please upload the custom Outbound Idoc creation config. steps
Hi,
Can u please tell me how the idoc work if i ordered one item in external application like eCommerce
then that sales order automatically trigger the idoc then move to sap that created sales order.
Please let me know “[email protected]”
Hi,
Can u please tell me how the idoc work if i ordered one item in external application like eCommerce
then that sales order automatically trigger the idoc then move to sap that created sales order.
Please let me know “[email protected]”
Hi Bharathi,
Question is very generic and there are multiple ways to integrate eCOM orders with SAP. It depends on the capabilities of the eCOM site and your clients integration tools.
You can use standard ORDERS idoc to create sales order in SAP. How information cab be transmitted from eCommerce website to SAP depend on the capabilities of eCommerce website. They can transmit the data using SOAP calls, RFC calls, files etc. if your client has license to PI/PO then you can use use capabilities of PI/PO to communicate with eCOM site.
for example: eCOM sFTP->PI/PO->SAP ORDERS iDoc or eCOM SOAP->PI/PO->SAP ORDERS iDoc
Cheers!
Isuru
Super one..
Thank you Divya!
Hi Isru,
great tutorial, very clear and concise, I especially like the overview.
One non-content related question: How do I set my SAP GUI to look like yours, I especially like the icons.
Keep up the good work,
Cheers
Christian
Thank you Christian. I was using a Macbook Pro so what you see is SAP GUI for Java which is compatible with Mac OS 🙂
Great article.
Contratulations.
Thank you Antelio!
Hi ISURU
I have been reading your articles from past one year .
I am impressed with this article, it’s clear and helpful.
Thank you.
Thank you very much Abdul! I am glad to hear that. Where are you from?
Great Work dude..
Thank you, Sunny!
Hello Sunny Vaswani,
Currently I am facing problem with IDoc status 03 in outbound process. it says dispatch OK but no documents are generated.
In inbound process the final status ‘ delivery xxxxx created’. my question is where can use this delivery number ?
it looks like process is completed but i don not see any billing document or material document created.
could you please help me solving this issue.
From,
Shiva Charan Koti.
Germany.
Good article. How do you configure outbound Idoc? I need to send custom Idoc data from SAP to another external system.
Hello Deepak,
Check the article on outbound iDoc configuration.
Cheers!
Isuru
Hi Isuru,
Thank you so much for sharing this.
Regards,
Jayasri
You are welcome, Jayasri!
Hi Isuru,
I have configured Outbound Idoc for Invoice using message type INVOIC02 and it triggered successfully however few Standard Fields in Segment E1EDP01 like LGORT, MATNR,ABRVW,PEINH etc are missing in IDoc XML.
Kindly help on this.
Thank you,
Jayasri
Muito bom, sempre que preciso consulto este link
Thank you, Rogerio!! 🙂
Hi,
Thanks for this article. However, I noticed that you create ZEMP_DESIGNATION but didn’t use it anywhere. Did I miss something?
No, it is just one more custom segment. The procedure is the same regardless.
No, it is just one more custom segment. The procedure is the same regardless.
Hi Jayasri,
Did you get a solution to this problem? I am in a similar situation missing tags with no error logs message type INVOICE02 Segment E1EDP01, Tags BMNG2, PMENE,VPREI,PEINH,NETWR.
Hi Isuru,
Do you have any idea why this type of error happens?
Thank you,
Tishan
Hello,
Thanks for this great article. It helped me a lot.
Regards
Rucha