In this article, we will look at an end-to-end EDI transmission that utilizes outbound iDocs and Output Determination. Not only will we examine Outbound iDoc and Output Determination configuration steps in detail, but also discuss different outbound iDoc generating methods in SAP, as well as how to troubleshoot and test an outbound iDoc scenario.
Moreover, we will look at some common error messages of iDoc and Output control.
Outbound iDoc Triggering Methods in SAP
There are several methods to generate outbound iDocs in SAP. Each of them serves a different purpose.
The main methods of generating outbound iDocs in SAP are,
- Using ALE Change Pointer mechanism
- Via Output Determination
- Using custom ABAP Program
Generating Outbound iDocs using Change Pointers
To transfer master data between different systems we can use the ALE/iDoc framework and, particularly, its Change Pointers functionality. In most organizational system landscapes, SAP is the central system that manages master data such as Customer master, Vendor master, Materials master, etc. Using iDocs issued by Change Pointers you can transfer master data from the central SAP system to other systems in the landscape and other integrated systems.
You can configure Change Pointers to flag master data changes (Create/Update/Delete) in SAP. Using these flags, outbound iDocs generated in SAP can be directed to different receiving systems. The flagged master data changes are stored in Change Pointers table BDCP2 in SAP S4 HANA.
With the help of program RBDMIDOC, entries stored in the BDCP2 table can be processed to generate outbound iDocs.
Creating Outbound iDocs via Output Determination
Similar to how we use Change Pointers for master data distribution, the Output determination technique can be used to generate iDocs for transactional data. To send transactional data such as sales orders, Purchase Orders, Delivery, Shipment Confirmations, etc., to partners and their systems, output types can be configured in SAP.
In certain business processors every time a Purchase Order is created in SAP, the PO should be sent to the vendor of the Purchase Order. Output determination can be configured to trigger an EDI Output Type to vendor when a Purchase Order is created in SAP. Outbound iDocs generated from these EDI Output Types can be transferred to the vendor or external system.
In this article, we will look at how to configure the Output Determination in Condition Record technique and how to trigger Outbound iDocs from the generated outputs.
Generate Outbound iDocs using ABAP Programs
Although not as common as Change Pointers or Output Determination methods, custom ABAP programs are sometimes used to create iDocs.
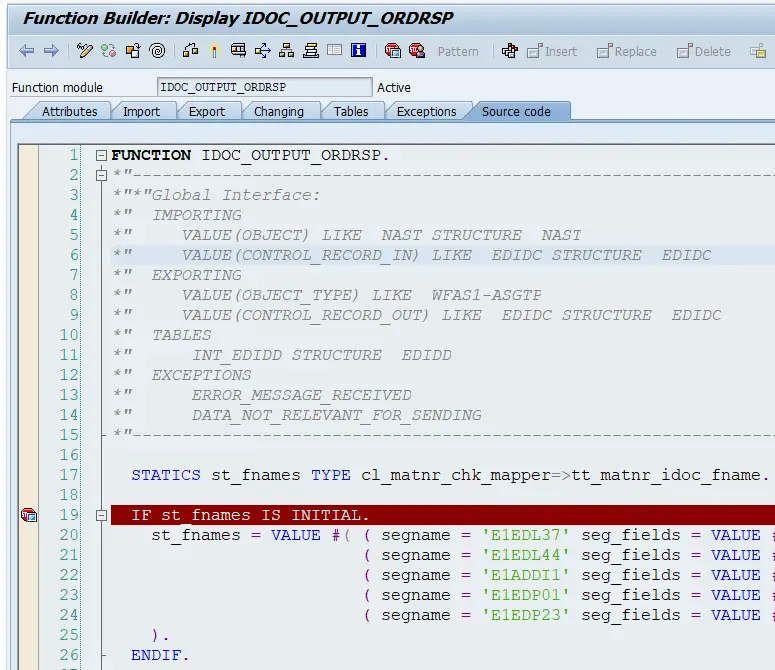
To generate Outbound iDocs from ABAP programs, first, you need to find the Outbound iDoc that creates Function Module of the iDoc Message type and iDoc Basic type. Go to transaction we57 to find the FM you can use in an ABAP program to generate outbound iDocs.
Use the Function Module ‘IDOC_OUPUT_ORDRSP’ in your custom ABAP program to generate ORDRSP iDocs.
If the outbound iDoc is a master data iDoc, use the FM ‘MASTER_IDOC_DISTRIBUTE’ in the ABAP program to create iDocs.
Practical Scenario for Outbound iDoc Generation using Output Determination
Now let us look at a real-life scenario where outbound iDocs should be transmitted to an external system. In B2B (Business-to-Business) process, when EDI sales orders or purchase orders are created in SAP, order confirmations are sent back to the EDI partner. This is the standard practice in most B2B EDI integrations.
Let’s assume an organization manages orders from an external Order Management System (OMS) or EDI partner. Sales orders in SAP are created by the EDI orders sent from OMS system. For sales orders to be successfully generated in SAP, the order confirmations should be sent back to the OMS system.
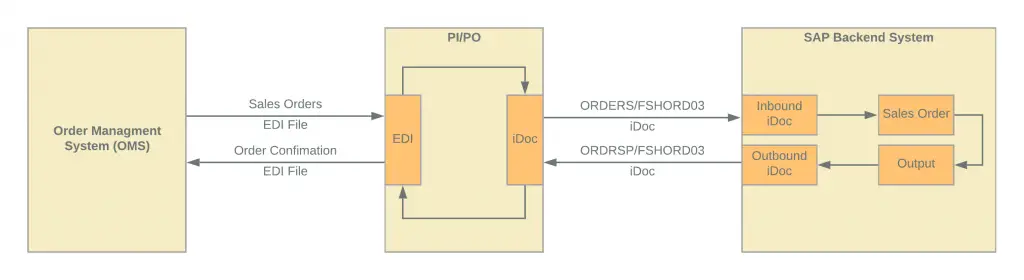
Orders sent from OMS system are created by using standard ORDERS inbound iDoc, while Order Confirmation back to OMS is sent using ORDRSP outbound iDoc. As we discussed previously, there are multiple ways to generate outbound iDocs in SAP. But the standard practice for EDI sales order process integration is to use Output Determination that generates Order Confirmation iDocs from the created sales orders. More specifically, the Condition Record technique of the Output Determination is used.
In our example, we will generate a new Output type ZOOC from all sales orders created in SAP under sales order type XSTA. We will use standard order confirmation iDoc Message Type ORDRSP. The output should generate the iDoc to Logical System OMS. Order response iDoc is sent to OMS system via SAP Process Orchestrator (SAP PI/PO).
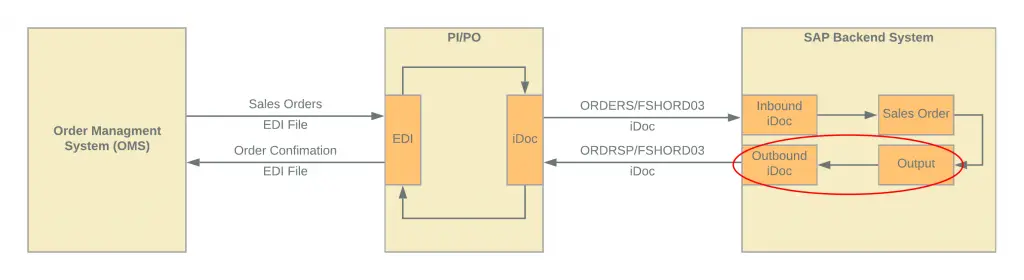
Overview Diagram: We will look at the highlighted processors of the EDI integration.
Object names used in the integration scenario:
| Sales Order Type | XSTA |
| Output Type | ZOOC |
| iDoc Receiver Logical System (partner) | OMS |
| Outbound iDoc Message Type | ORDRSP |
| Outbound iDoc Basic Type | FSHORD03 |
| Logical System Name | OMS |
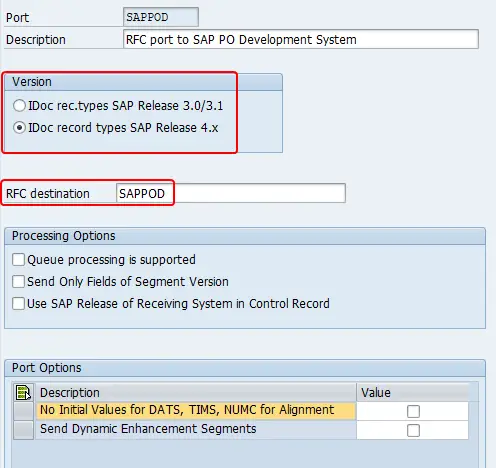
| RFC Destination to SAP PI/PO | SAPPOD |
| Receiver Port to SAP PI/PO | SAPPOD |
All sales orders created for Sales Organization X401 and customer BP001 should be transferred immediately to OMS when saving the sales order application.
Outgoing iDoc and Output Determination Configuration Steps:
- Pre-requisites
- Create a Logical System or Partner
- Identify the Output Procedure of Sales Order Type
- Output determinationConfiguration
- Define a new Output Type (NACE > Output Types)
- Configure General Data and Access Sequence of Output Type
- Maintain the Default Values of the Output type, Transmission Medium, Dispatch Time and Partner Function
- Configure Processing Routine (ABAP program and form)
- Set Partner Functions
- Configure Output Procedure (NACE > Procedures)
- Maintain Conditions for Output Control (NACE > Condition Records)
- Outbound iDoc Configuration
- Additional steps for a custom Message Type and сustom iDoc Basic Type
- Create Segments – we31
- Generate iDoc Basic Type – we30
- Create Message Type – we81
- Assign message type to iDoc type – we82
- Define iDoc processing FM se37
- Assign iDoc processing FM to message type and iDoc type we57
- Create and Configure RFC Destination
- Register RFC Program ID
- Create a new RFC destination – sm57
- Create iDoc Port
- Configure Outgoing parameters of Partner
- Define Outbound options receiver port, package size, iDoc type
- Configure message control
- Additional steps for a custom Message Type and сustom iDoc Basic Type
Prerequisites and First Steps of the Configuration
There are a few initial configurations that should be done before we can move to Outbound iDoc configuration and Output Determination configuration.
Prerequisite 1 – Create Logical System
One of the prerequisites is to represent the external system OMS in SAP. This can be achieved by creating the OMS external system as a Logical System in SAP. We need the Logical System for both Output Determination, Outbound iDoc configuration, and Partner Profile configuration.
To create a Logical System, go to transaction Sale and navigate to “Define Logical System” node under “Basic Settings“>”Logical Systems“.
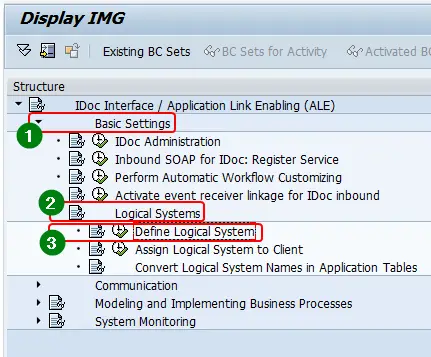
You can also access the same functionality via transaction bd54.
Whichever method you use, add a new entry to the list of Logical Systems and define it.
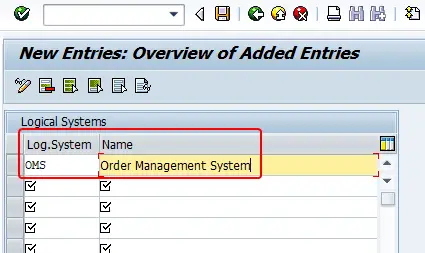
Hit “Save”.
Prerequisite 2 – Identify the Output Procedure of Sales Order Type
In this example, we will use the existing sales order type XTRA instead of creating a new Document Type. Hence, we need to identify the Output Procedure configured in the sales order Document Type.
To identify the Output Procedure assigned to the sales order Document Type (in our example, XTRA), go to transaction SPRO and navigate to Sales and Distribution > Basic Functions > Output Determination > Output Determination Using the Condition Technique > Maintain Output Determination for Sales Documents > Assign Output Determination Procedure.
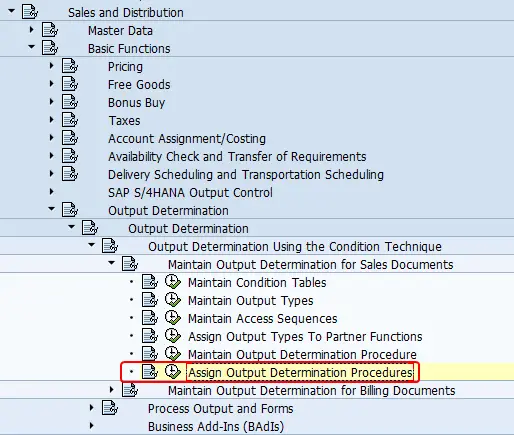
Then select the sales order Document Type (XTRA) to find the Output Determination procedure attached to it.

The Output Procedure of sales order Document Type XSTA is X10000. We will use this in the Output Determination procedure configuration.
Output Determination Configuration
Now that we have all prerequisites covered, we can move to the next step of the outbound iDoc configuration using Output Determination.
In this step, we will create a new EDI Output Type (ZOOC). Then we will fully configure the Output Determination procedure to trigger the EDI order output when a sales order of Document Type XTRA is created in Sales Org X401 for customer BP0001.
Step 1: Define a New Output Type
If you are configuring Output Determination from scratch, the first step is to create the new Output Type. In our example, the new Output Type is ZOOC.
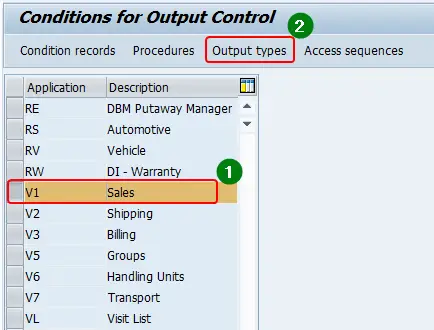
To create a new Output Type under sales, go to transaction NACE and select the application area as Sales (V1), then click Output Type in the top menu.
Next, select change mode and add a new Output Type ZOOC.

You can also access this configuration screen directly using transaction code V/30.
Step 2: Configure General Data and Access Sequence of Output Type
In this step, we will configure the General Data of the new Output Type ZOOC.
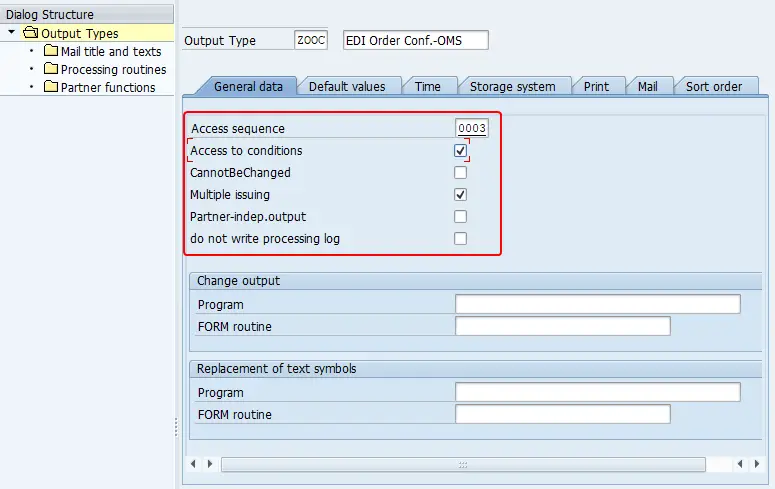
These are some of the most important parameters of Output Type with their functionalities,
Access Sequence:
This is the main parameter that determines the condition tables and sequence of the condition tables.
In other words, when a sales order is created, the system will check records maintained in these access sequence tables to determine whether to trigger the output or not.
In our example, we want to trigger the output based on Sales Org and Customer. If the sales order belongs to sales org X401 and customer is BP001, we want to send the Order Confirmation iDoc to OMS system.
Therefore, we will use the standard Sales Org/Customer access sequence 003.
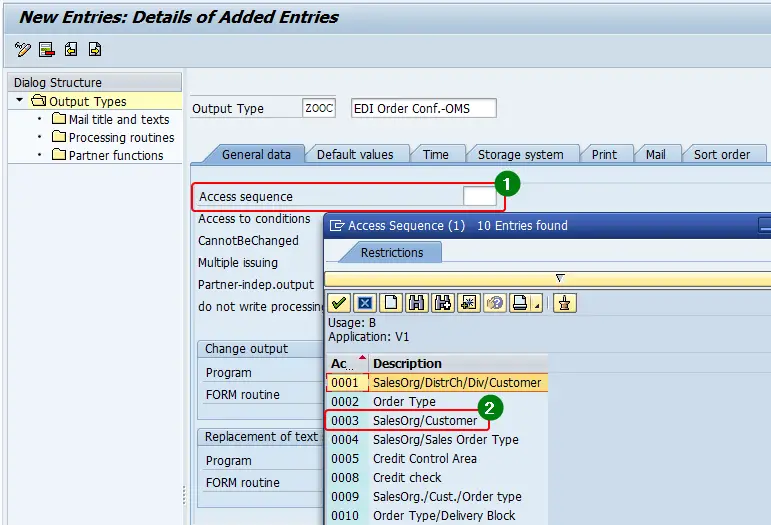
Tip: You can find the underline DDIC transparent table of the access sequence in tables T685 and T682I. To find the access sequence table, go to transaction se11 or se16n and filter the entries of table T682I based on the access sequence and application area.
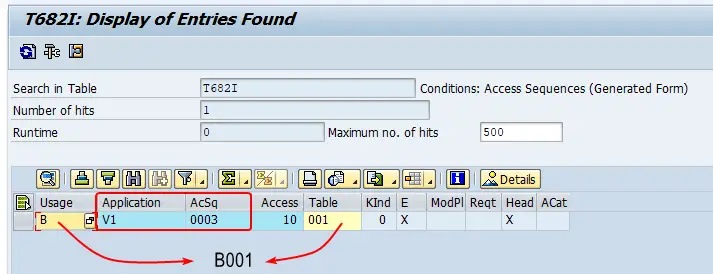
Then, combine the values of fields “Usage” (KVEWE) and “Table” (KOTABNR) to find the exact name of the condition table. In this case, table of Access Sequence 0003 is B001.
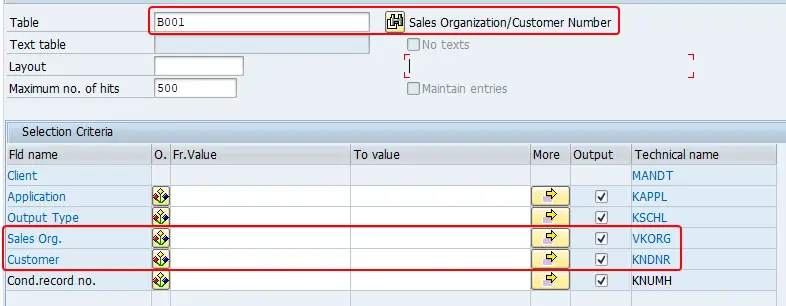
Access to Conditions:
If you want the system to determine the appropriate output based on Condition tables and access sequence, mark this parameter. If this parameter is flagged, when a sales order is created or changed, the system will automatically read the table B001 and determine if the output should be triggered.
Multiple Issuing:
If “Multiple Issuing” is marked, the system allows the same Output to be triggered to the same partner multiple times from the same SAP document (sales order).
You can mark this parameter, for example, if you want to trigger the iDoc/Output to the external partner for each change of sales order, or if you want users to be able to manually trigger the same output multiple times.
Do not write a processing log:
If you have system storage restrictions and disk space issues, you can mark this parameter. If it’s flagged, output determination and iDoc log won’t be saved in the database. The recommended method is to save the processing log, hence we will leave it blank.
The processing log of the output includes important information, such as different processing statues of the output with iDoc number.
Step 3: Maintain Default Values, Transmission Medium, and Partner Function
In this step, we will define the Dispatch time and Transmission medium of the output type.
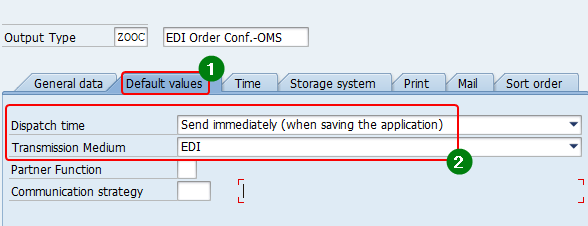
Dispatch Time
The dispatch time parameter defines when the output is sent to the external system. In other words, when the output should be processed from yellow (Not yet Processed) status to green (Output Sent).
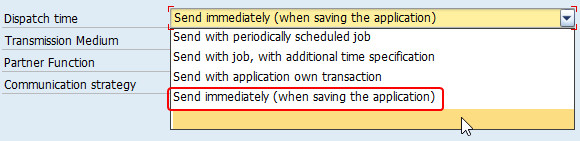
If you want to send the output immediately when the application document is created or changed (in this example, when a sales order is created or changed), select the Dispatch Time as “Send immediately (when saving application)“. With this configuration, when the sales order changes are saved to the database, the output is generated and sent to partner OMS immediately.
But keep in mind that this does not mean the iDocs are sent to OMS immediately since you can control outbound iDoc processing the same way. You can either send the iDocs immediately or via an iDoc processing background job. We will look at this outbound Partner Profile configuration in the next step.
But if you want to collect all the outputs generated for a certain time period and periodically send them to the external system(s) at a certain time, you can select “Send with the periodically scheduled job“. With this configuration, the output will be in yellow status till the batch job picks it up and processes it. Schedule RSNAST00 program as a background job to process outputs in status “Ready to be processed”.
Transmission Medium
There are multiple transmission mediums you can use in SAP to send output documents to partners. To transfer documents to partners as iDocs use Transmission Medium EDI.
Step 4: Configure Processing Routine (ABAP program and form)
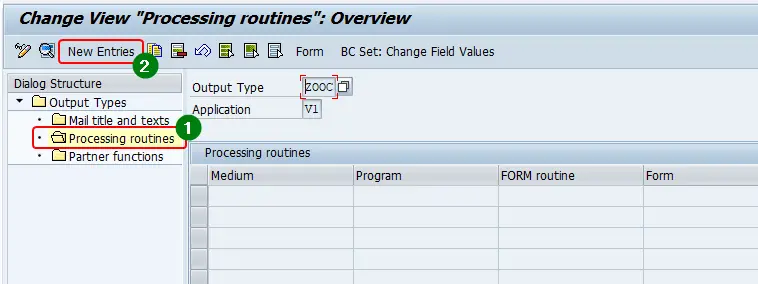
From the left-hand-side menu, select “Processing Routine“. Then, add a new entry to configure Transmission Medium EDI.
On the next screen maintain the Transmission Medium as EDI, ABAP program as “RSNASTED“, and processing routine (form routine) as “EDI_PROCESSING“.
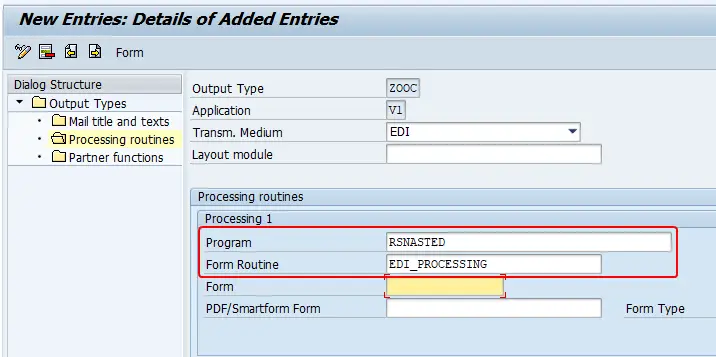
Click “Save”.
RSNASTED is the output processing program for different output mediums. EDI_PROCESSING is the ABAP processing routine for EDI output types.
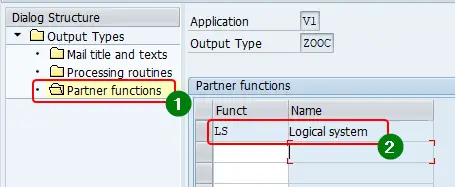
Step 5: Set Partner Functions
Now select “Partner Function” from the left-hand-side menu and configure a partner function of the Output Type. This configuration defines the type of partner to which the output will be triggered. In our example, we want to send the ZOOC EDI output to OMS Logical System. Hence, configure Meidum as EDI and Function as “LS” (Logical System).
Click “Save” and go back to the main screen of transaction NACE.
Step 6: Configure Output Procedure
Select the application area Sales (V1) and select “Procedure” from the top menu.
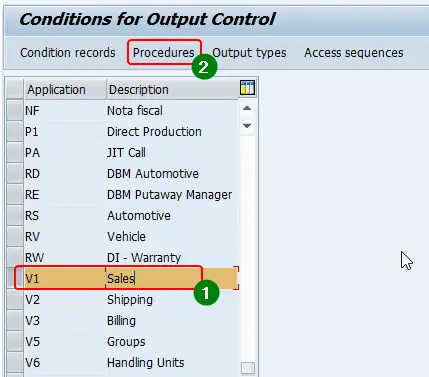
Now select the Output Procedure of the sales order Document Type we determined in the Prerequisites step. In our example, the Output Procedure of the Sales Document Type XSTA is X10000.
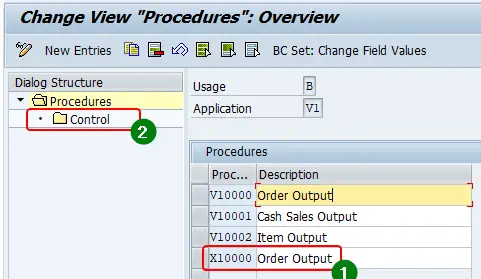
After selecting the correct Procedure, click Control from the left-hand-side menu.
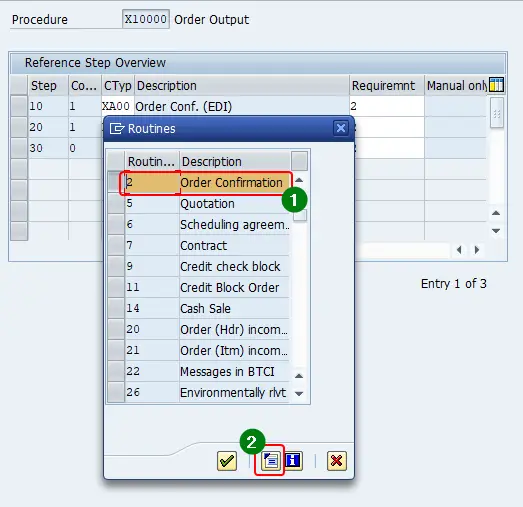
Then add the Output Type ZOOC as a new step to Output Procedure X10000.
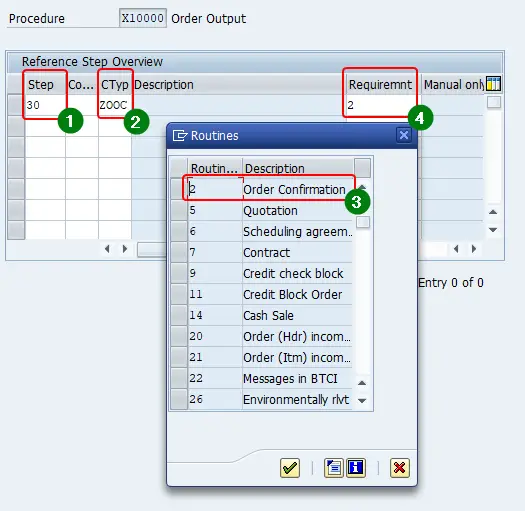
Assign the next available sequence number to “Step” of the Output Procedure. In Procedure X10000, there were two steps (10 and 20) already assigned. Hence, I have selected step number 30 to assign the new Output Type.
Here we will add “Requirement” as Order Confirmation that is denoted by “2“.
The Requirement of the Output Procedure
Requirement is a special ABAP code that validates if the SAP document (in this example the sales order) meets certain criteria from a business perspective to trigger the output.
Requirement routine 2 (Order Confirmation) validates if the sales order is “Complete”. If the sales order is incomplete or a credit block is set, the order confirmation output is not triggered by the sales order.
Routine 2 (Order Confirmation) is a standard SAP routine. You can view the executed ABAP routine by selecting the option “Source text“.
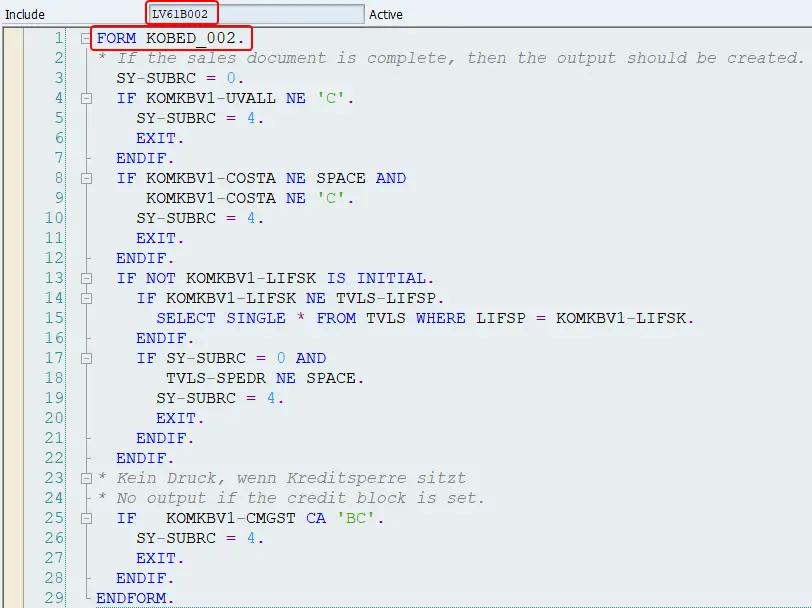
You can create your own custom requirement routines in SAP. If the requirement routine returns the value 4 from system variable SY-SUBRC, it restricts the output from being issued from the sales order.
In the above requirement, the routine output is suppressed by setting the SY-SUBRC to 4 if the sales order is having a credit block of B or C (ABAP code lines from 25 to 28).
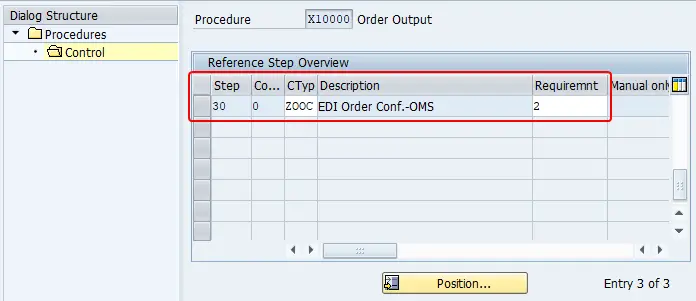
Save the configuration in the procedure and return to the main screen of NACE transaction.
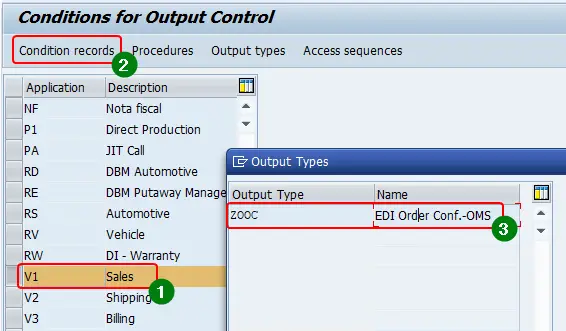
Step 7: Maintain Conditions for Output Control
The last step of the Output Control is to set up the condition records that determine the output. Store the sales organization/customer entries in the access sequence table B001.
After selecting application area Sales (V1), select “Control Records“. In a pop-up window, system will display a list of Output Types under the application, select your Output Type.
Select the sales organization X401.
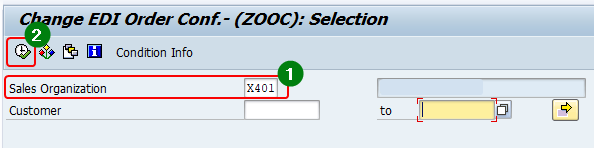
Maintain the customer ID BP001 and Logical System OMS.
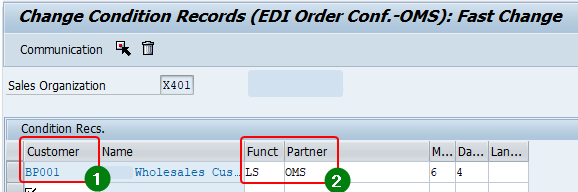
Now output determination is ready to issue EDI outputs from the sales orders of type ZXRE under sales organization X401 and customer BP001 to Logical System OMS.
Outbound iDoc Configuration
Now that we have completed the Output determination, let’s look at Outbound iDoc configuration steps in detail. In these steps, not only will we configure the OMS Logical System with ORDRSP/FSHORD03 iDoc, but also build a link between the Output Type ZOOC and the iDoc ORDRSP.
Step 1 – Additional iDoc Configuration for a Custom Message Type and Basic Type
If you are planning to trigger a custom iDoc type you can follow these steps to set up the Outbound iDoc:
- Create iDoc segments – we31
- Define iDoc Basic Type – we30
- Create custom iDoc Message Type – we81
- Assign custom Message type and iDoc Basic type – we82
- Define the iDoc processing Function Module (FM) – se37
- Assign iDoc processing FM to Message Type and iDoc Basic type – we57
Since we are using the standard Message Type ORDRSP and iDoc Basic type FSHORD03, all of the above configurations are already in place. But you can follow the transactions in this sequence to make sure the configuration is maintained as expected.
Step 2 – Create and Configure RFC Destination
In this step, we will create an RFC destination to SAP PO system. If you are using a different integration method (for example, HTTP) create another appropriate RFC destination type.
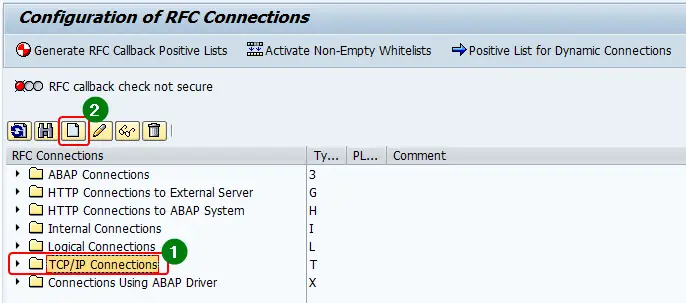
In this example, since we are connecting to SAP PI/PO system, we will create a TCP/IP destination of connection type T.
Creation of the RFC destination is done in two steps,
- Register the external program ID
- Create the RFC destination via transaction sm59
Register RFC Program ID
This step is usually performed by the BASIS team when setting up the system. Program ID is registered either in saprfc.ini file or using the program interface in rfclib. Get assistance from your BASIS team for this task. Learn how to register the program ID using saprfc.ini file here.
Create RFC Destination
Go to transaction sm59 and select the appropriate connection type node from the left-hand-side menu. Then click “Create” in the top menu.
Provide a name for the RFC destination. We are connecting to SAP PI/PO system POD, therefore, we will name the RFC destination as SAPPOD.
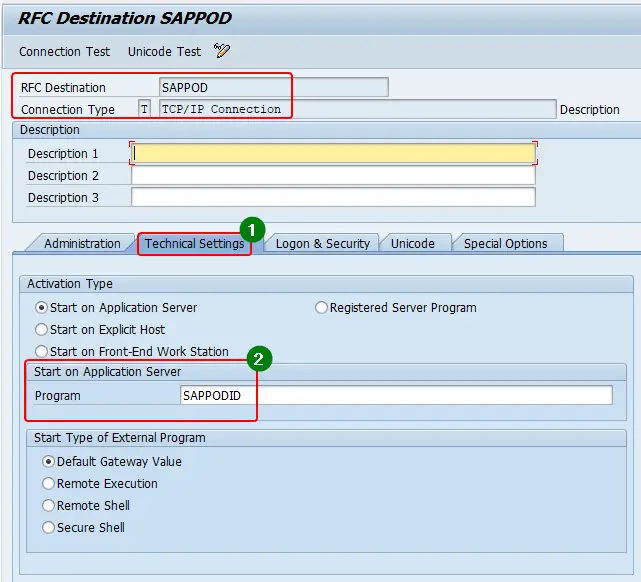
Under the “Technical Settings” tab of TCP/IP destination parameters, configure the Program ID registered in the previous step.
Also, configure the Gateway Options, Gateway Host and Gateway Service.
Click “Save”.
Step 3 – Create iDoc Port
Similar to how shipping ports are used to move goods between vessels, SAP ports are used to transfer iDocs between systems. ALE framework sends the outbound iDocs to Port to transfer the iDoc to the target system.
There are different types of ports in SAP:
- Transactions RFC or tRFC
- File
- ABAP-PI
- XML File
- XML HTTP
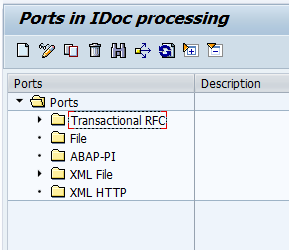
Since we use a TCP/IP RFC destination to connect to SAP PI/PO system, we need to create a tRFC port.
However, if you want to create files from outbound iDocs, directly from SAP, use File or XML file port. Similarly, use the appropriate port type for your integration scenario depending on how outbound iDocs are transferred to the target system. If you use a file Port to transfer iDocs, you also need to configure the Outbound iDoc filenames.
To create a Port, go to transaction we21 and select the appropriate port type from the left-hand-side menu.
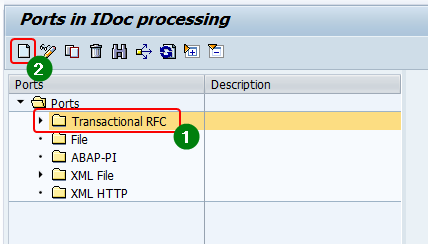
Click on “Create”.
In the next screen, provide the Port name, description, as well as the RFC destination we created in the previous step.
Step 4 – Configure Partner Profile and Outbound Parameters
This is the final step of outbound iDoc configuration.
At this point we will,
- Create a Partner in transaction we20
- Configure outbound parameters of ORDER
Create the Partner Profile in we20
In this step, we will import the Logical System we created using transaction bd54/sale in the previous step as an iDoc partner.
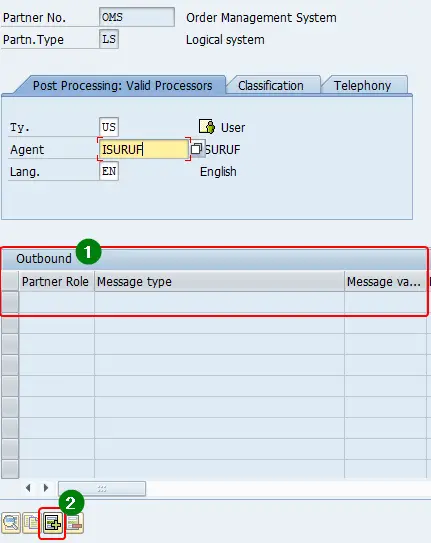
To create a new Logical System as a partner, go to transaction we20 and select the node Partner Type LS from the left-hand-side menu. Then click “Create”.
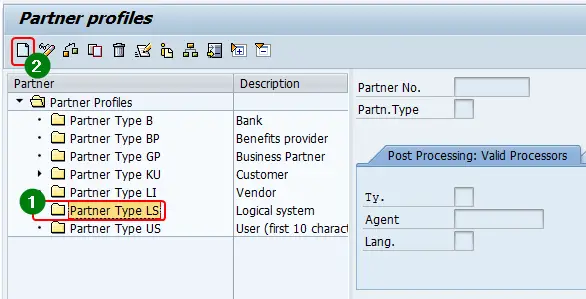
Next, assign the partner name and Partner Type. The partner name should be the same as the logical system name we defined in transaction bd64/SALE.
In this example, therefore, we will name the partner as OMS. Partner type is LS (Logical System).
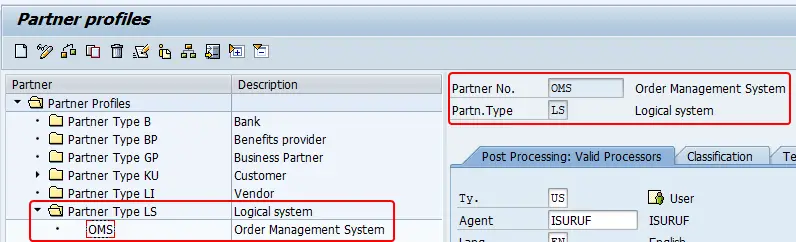
Under “Post Processing: Valid Processors” tab we can configure the agent who should be notified when iDoc errors occur. An agent can be of different types: Work Center, Job, Organizational unit, Person, Position, User.
Click “Save”.
I have assigned my user ID as the agent for this example. But this does not mean my SAP inbox will be flooded with iDoc error messages. A special workflow should be configured if you want the agent to be notified, however, agent and agent types are mandatory parameters when defining partners in SAP.
Configure Outbound iDoc Parameters of Partner Profile
Here we will assign the outbound iDoc parameters and Output Type details to partner profile.
In the previous step we have already created all the parameters required to configure the partner profile:
- iDoc Message Type/iDoc Basic type
- Reciever Port
- Output type
In this configuration, all those individual objects we created in different steps will link together.
To create a new Outbound profile of the Partner, click “Create Outbound Parameter”.
In the next screen, define mandatory parameters Partner Role, Message Type, Receiver Port, and Basic Type.
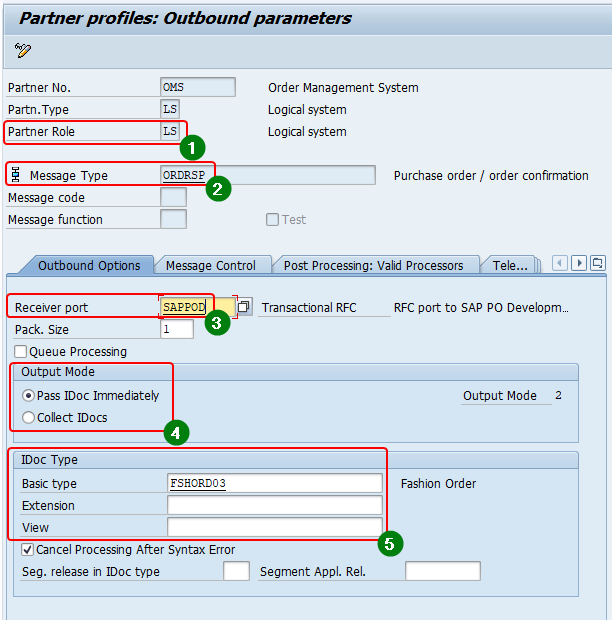
In this example, Message Type is ORDRSP and the iDoc Basic Type is FSHORD03.
Assign the Port SAPPOD we created in Step 3 as the Receiver Port.
Another important parameter is the Output Mode of the Outbound iDocs.
Output Mode can be either,
- Pass iDocs Immediately
- Collect iDocs
We will discuss the functionalities of these modes in detail under the “Outbound iDoc Processing Methods” section.
Click “Save”.
iDoc Message Control Configuration
In this step, we link the Output Type (ZOOC) with the ALE Outbound iDoc processing.
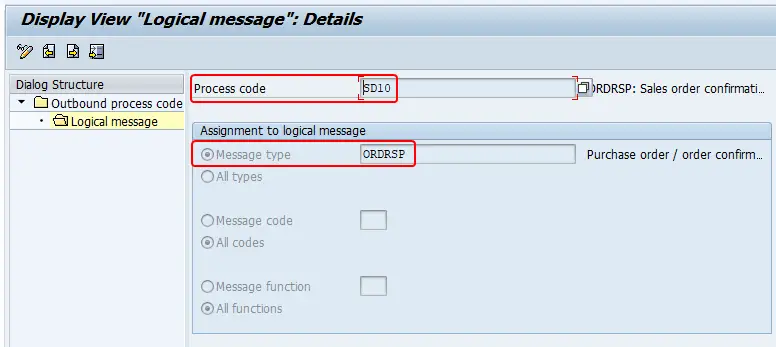
To set up Message Control of the Partner profile, go to the tab “Message Control” and click “Add”. Then maintain the configuration for Application, Message Type and Process Code.
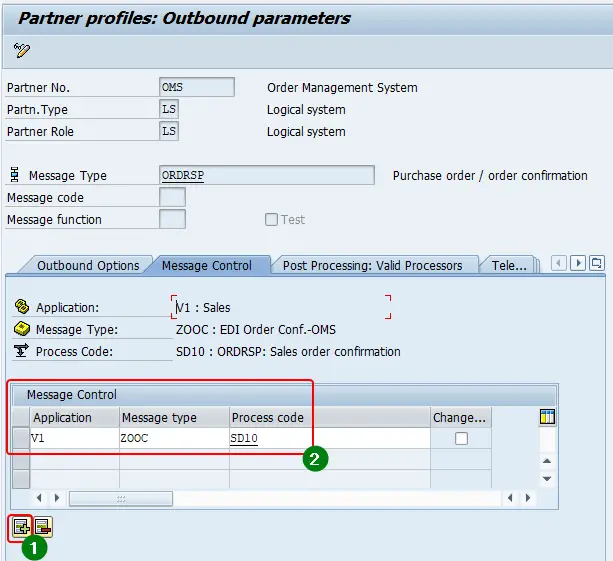
- Application: This is the application area the Output belongs to.
- Message Type: Output Type defined in NACE.
- Process Code: Outbound iDoc process code of the Message Type/iDoc type. Click on the “Process Code” drop-down menu to find a list of valid Process Codes for the Message Type. You can also use transaction we42 to find the Outbound iDoc Process code.
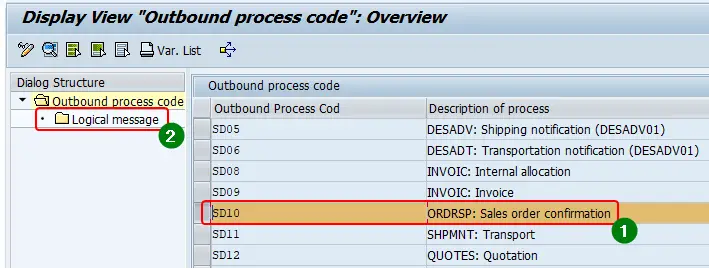
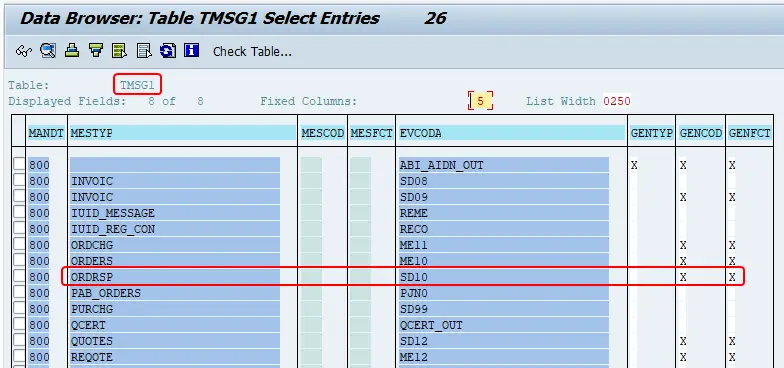
Tip: In my experience, we42 is not an ideal way to find the Process Code, because the function “Position” might act strange sometimes. Also, you might need to find the Process Code from iDoc Message type. Therefore, I use the transparent table “TMSG1” directly via transaction se11 or se16 to find Outbound Process codes and the Message Type assigned to it.
Test the iDoc Configuration and Output Determination
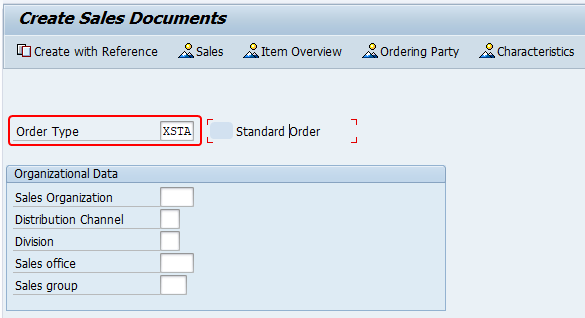
To test the scenario we built, go to sales order creation transaction va01 and create a new sales order of Document Type XSTA for Customer BP0001 under Sales Organization X401.
Save the sales order.
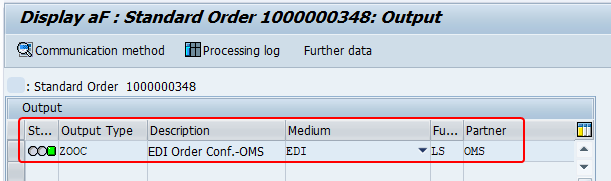
View the Output Generated from Sales Order
Go to transaction va03 to view the sales order we just created.
From the main menu, select Extras > Output > Header > Edit to view the outputs generated from the sales order.
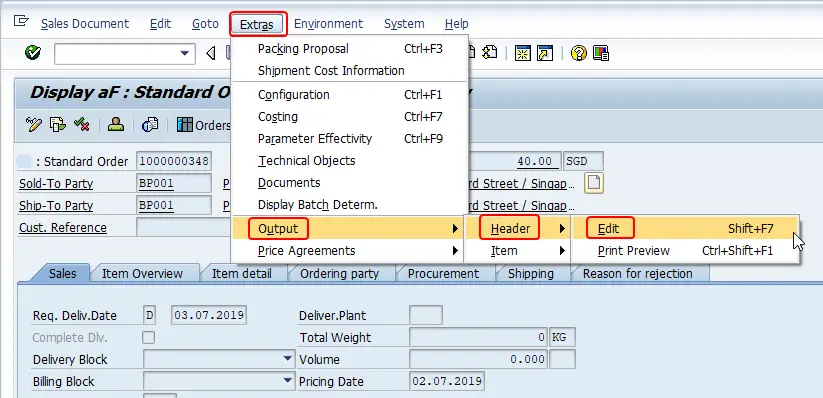
You will notice that the Output ZOOC is generated and transferred to partner OMS.
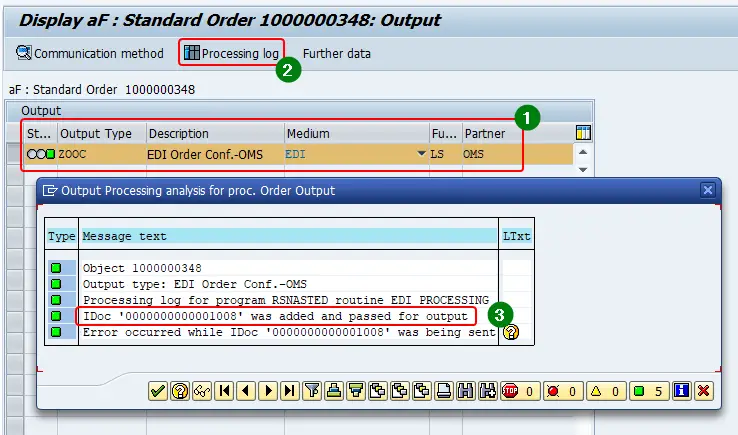
Identify the Outbound iDoc Generated from EDI Output
To identify the outbound iDoc generated from the output, select the Output first and then select the Processing Log.
Monitor the Outbound iDoc via we02
Go to transaction we02 and monitor the status of the outbound iDoc.
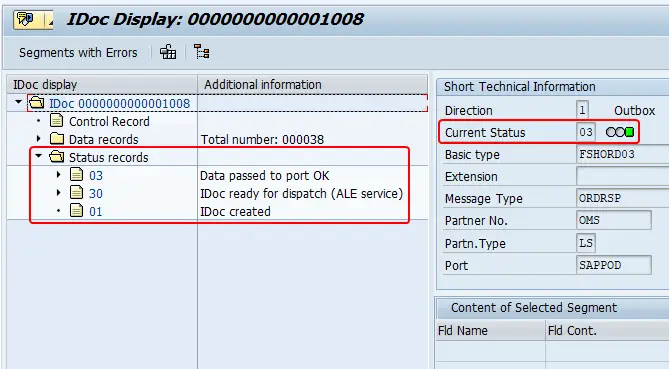
Observe the flow of the iDoc from Status 01 to 30 to 03.
Outbound IDoc Processing Pipeline, Statuses and Techniques
Outbound iDocs are created in the Application Layer and then passed to ALE layer for processing and transmitting to the target system. When an iDoc passes these layers, it goes through certain milestones also known as iDoc statuses.
An outbound iDoc generated from the application layer first goes into status 01 (iDoc created). If there are no errors in processing, the iDoc is then transferred to ALE layer in status 30 (iDoc ready for dispatch – ALE service). Finally, if there are no further errors, the iDocs are passed to Outbound Port to be sent to the receiver system. Outbound iDocs passed to the external system successfully from receiver Port will be in status 03 (Data dispatched to port ok).
Outbound iDoc processing happy scenario:
01 (iDoc created) > 30 (IDoc ready for dispatch – ALE Service) > 03 (Data dispatched to port ok)
Based on how you control the iDoc passing from Status 30 to 03, there are two main methods to process Outbound iDocs:
- Trigger Immediately
- Collect and process via Background Job
You can configure these modes in Output Mode of the Partner Profile. We have already configured them in Step 4 of the Outbound iDoc configuration.
List of Outbound iDoc Statuses
| 01 | IDoc created |
| 02 | Error passing data to port |
| 03 | Data passed to port OK |
| 18 | Triggering EDI subsystem OK |
| 19 | Data passed to port for test |
| 20 | Error triggering EDI subsystem |
| 21 | Error passing data for test |
| 25 | Processing despite syntax error (outbound) |
| 26 | Error during syntax check of IDoc (outbound) |
| 27 | Error in dispatch level (ALE service) |
| 28 | IDoc sent to ALE distribution unit retroactively |
| 29 | Error in ALE service |
| 30 | IDoc ready for dispatch (ALE service) |
| 31 | Error – no further processing |
| 32 | IDoc was edited |
| 33 | Original of an IDoc which was edited |
| 34 | Error in control record of IDoc |
| 35 | IDoc reloaded from archive |
| 37 | Error when adding IDoc |
| 38 | IDoc archived |
| 39 | IDoc is in the target system (ALE service) |
| 40 | Application document not created in target system |
| 41 | Application document created in target system |
| 42 | IDoc was created by test transaction |
Trigger iDocs Immediately
With this configuration in place, the system will automatically pass each iDoc generated from the application layer to Outbound Port immediately. It means that as soon as the output is processed, iDoc is passed to the Port and sent to the external system.
iDoc passes different processing stages 01 (iDoc created) > 30 (IDoc ready for dispatch – ALE Service) > 03 (Data dispatched to port ok) immediately.
This is not the ideal Outbound iDoc processing technique for an SAP productive system. As each iDoc created in the system is passed to the tRFC port individually, this process puts a lot of strain on the system performance.
Collect iDoc and Process via Background Job
“Collect iDocs” method allows us to park the iDocs created in status “iDoc ready for dispatch” (30). Collected iDocs are transferred to Port (03) using program RSEOUT00. You can configure the amount of iDocs that are transferred to Port at a time using the parameter “Pack Size”.
If Pack Size is set to 50, 50 iDocs in status 30 will be transferred to tRFC port at a time from the program RSEOUT00.
The standard practice is to set the partner profile to “Collect iDocs” and setup RSEOUT00 as a periodic background job.
But notice there is another parameter called “Maximum number of iDocs” in the selection screen of program RSEOUT00. This parameter defines the number of iDocs added to the Port before “commit work”. It is important to assign a reasonable number of iDocs to this selection option to avoid runtime errors and timeouts due to performance issues.
Issues Faced While Configuring Outbound iDoc/Output and How to Troubleshoot
After configuring the Output Determination and Outbound iDoc, try to create the output manually from a sales order to make sure all basic settings are correct.
These are some of the issues I faced while configuring the practical scenario in my demo system.
VN032: Maintain outgoing EDI-connection data for partner OMS

This error message is shown when generating the Output if you have not configured the Message Control in the Outbound profile of the partner.
Maintain the Message Control configuration as shown in Step 4 of the Outbound iDoc Configuration section.
E0342 – Maintain a Valid Partner Number
You will get this error when creating a new partner in the transaction we20 if you have not maintained the partner as a Logical System in bd54 (sale).

Check the prerequisite #2 of the guide. The logical system should be maintained in bd54 before it can be used as an EDI partner in we20.
E0266 – Could not find code page for receiving system
This is an iDoc error that could occur when passing the iDoc to Receiver Port. If the Program ID of the RFC destination is not registered correctly, this issue can occur.

The outbound iDoc will terminate with the error in status 02 (Error passing data to port). You can request your BASIS team to troubleshoot this error.
How to Debug Outbound iDocs
We can debug the iDoc generation Process Code of an Outbound iDoc configured via Output Control in four easy steps:
- Set the Output Type Dispatch Time to Option 1 (Send with a periodically scheduled job)
- Set a break-point in iDoc processing FM (process code)
- Issue the output from SAP application document
- Execute program RSNAST00
Step 1 – Change the Dispatch Time of the Output Type to Option 1
It is important to understand we cannot easily debug the iDoc generation FM (process code) using Dispatch Time option 4 (Send Immediately when saving the application).
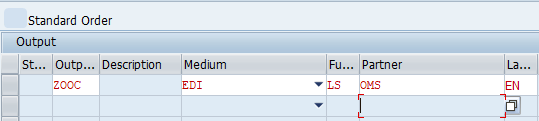
Go to transaction NACE > Application Area > Output Type and change the Dispatch time to “Send with Periodic Batch Job”.

Click “Save”.
Step 2 – Assign a Break-point in iDoc Processing FM (Process Code)
First, find the Process Code under Message Control of Partner Profile.
Then, go to transaction we57 and find the iDoc processing FM. Or you can directly go to transaction se16n or se11 to find the FM using table EDIFCT.
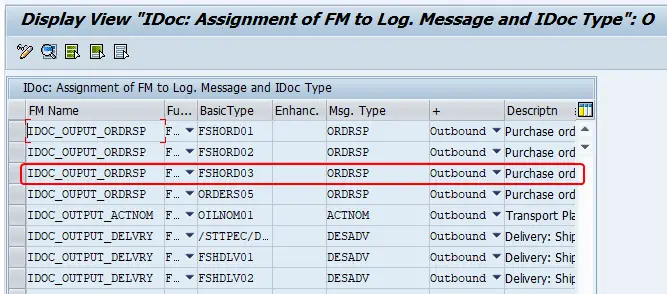

Finally, go to transaction se37 and set a break-point in iDoc creation Function Module “IDOC_OUPUT_ORDRSP”.
Step 3 – Create a New Output in Sales Order Document
Either create a new sales order document or a new output from an existing sales order. The output should be in yellow status (ready to be dispatched).

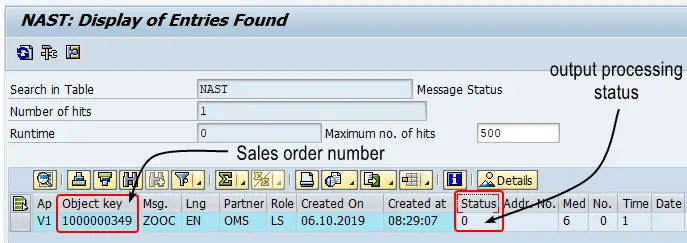
When you save the sales order, output entry should be stored in NAST table. The output will be in a status 01 (Not yet processed).
Step 4 – Execute Program RSNAST00
Execute the program RSNAST00 that issues outputs. The breakpoint in iDoc creation FM will be triggered.
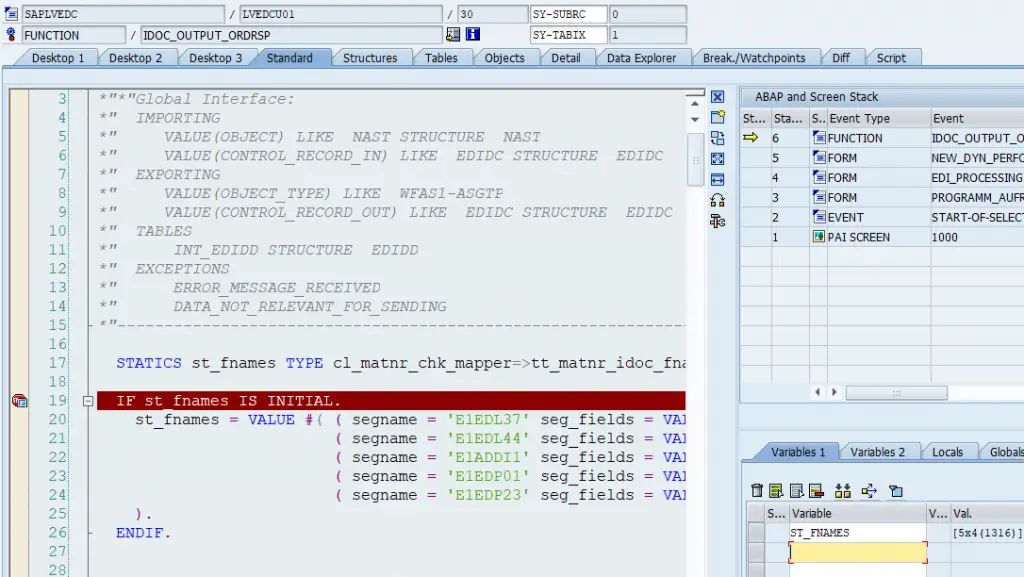
Now you can debug the FM that generates the iDoc from application data.
To summarize, you can use Output Determination to generate Outbound iDocs in SAP. Outbound iDocs generated by the output go through a processing pipeline that has multiple milestones (statuses). iDoc processing can be set up for “immediate processing” or “background processing”. This is controlled in the partner profile.
You can debug iDoc processing ABAP source code by setting a break-point in iDoc processing FM. Moreover, you can troubleshoot iDoc processing errors using iDoc status messages.
If you have any questions, leave a comment below!
Excellent stuff Isuru! Hats off to your work…keep going..Cheers!!!
Thank you, Gaurav!
Very Detailed..Great work!!..I configured similarly Output type determination for PO..But Idocs are failing with ME 760 Error Code on PO change with respect to a custom field scenario.We are triggering Idocs to two different systems parallely. For the first time, Idoc is failing to a system and then after next change to PO it is working fine.
Please share your valuable comments on the same.
Hi Chandra, Is the iDoc failing after getting created or output does not get triggered when you change the custom field?
Thank you, well done!
Thank you Peter!
Hi Isuru Fernando,
Firstly thank you for the detailed explanation. I am working in IS-Retail environment, could you please help me understand what is the difference between Partner Type KU and Partner Type LS.
Hi Rais,
Partner type KU is for customers and partner type LS represents logical systems. You can trigger outputs also to partner type KU, the prerequisite is the customer should be available as a master record in SAP.
Cheers!
Isuru
Hi Isuru,
Great, Thanks much for sharing more valuable. keep sharing. Thanks! Mahabooba
Thank you, Mahabooba!
HI Isuru,
Thank you so much for sharing this, I have configured Invoice outbound Idoc , IDoc has been triggered without any issue, however missing few fields In Segment E1EDP01 like PEINH, LGORT, MATNR.
Kindly help.
Thank you,
Jayasri
Hi Isru, Excellent explanation. Thanks.
Thank you very much, Sirisha!
Hi ISURU FERNANDO, this is an excellent explanation, While I am doing the same thing with a Purchase order (BASIC TYPE: ORDERS04, Message type: ORDERS), the output is triggering at Purchase order but in we20 Status is 02. How to solve it, please explain to me.
Mail id: [email protected]
Hai. Such a nice work. Great explanation. Can u please help me with asn outbound idoc process
thank you very much , very clear explanation, and very informative.
Great Work Isuru! Clear and detailed explanation. Thank you very much!!
Appreciate the support! Thank you 🙂
Thanks a lot, very helpful.
Thank you, Fernando!
Excellent
Thank you, Sridar!
Hi Isuru, What a Fantastic blog this is…Great work and i enjoyed…Never ever came across such a detailed blog..Hats off and Thanks. Please keep continuing.
Thank you very much, Jay!
Hi Isuru, it’s a very informative blog, I am very thankful to you for this.
Can I do the same for triggering invoice idoc?
Yes, you can, and thank you for the support!
Hi Isuru,
I follow your website for all my doubts and reading about Idocs. You explain in quite detailed manner. Highly Appreciated!
I have one doubt
Do we need process code for outbound Idocs. Could you please clarify why process code has been provided in the outbound parameters of partner profile.
I guess its required only for Inbound Idocs.
Kindly suggest.
Thank you,
Shweta.
I
Hi Isuru,
I follow your website for all my doubts and reading about Idocs. You explain in quite detailed manner. Highly Appreciated!
I have one doubt
Do we need process code for outbound Idocs. Could you please clarify why process code has been provided in the outbound parameters of partner profile.
I guess its required only for Inbound Idocs.
Kindly suggest.
Thank you,
Shweta.
Hi Isuru,
I follow your website for all my doubts and reading about Idocs. You explain in quite detailed manner. Highly Appreciated!
I have one doubt ,Do we need process code for outbound Idocs. Could you please clarify why process code has been provided in the outbound parameters of partner profile.
I guess its required only for Inbound Idocs.
Kindly suggest.
Thank you,
Shweta.
Thanks a Lot for your detailed explanation Isuru. I have require to create MATMAS03 Outbound IDOC with 50 different materials under same IDOC, can you help me the procedure.
Hi nice documentation which helps me understand how integration works with PIPO process. Could please you let me know how send an IDOC to FTP folder, what FM or program used in RFC destination ?
Hi nice documentation which helps me understand how integration works with PIPO process. Could please you let me know how send an IDOC to FTP folder, what FM or program used in RFC destination?